Pull the Amount, Date, and Store
From a PayPay Screenshot
PayPay is Japan's most-used QR payment app — 70 million registered users, over 3 million merchant locations, backed by the SoftBank and Yahoo Japan group now known as LY Corporation. When a payment completes, the confirmation screen isn't a receipt in the Western sense. There's no "Amount Due" field with a box around it. No line that says "Receipt #." What you get instead is a transaction entry in your app history (取引履歴) — a screen that crams five or six data points into a compact feed design, where the amount, date, and store name are all present but not labeled in the way a paper receipt labels them. If you're pulling data from PayPay screenshots — for the monthly household budget (家計簿), a freelance income log, or a stack of expense claims filed through Concur — knowing which number is which, and which ones don't exist on screenshots from any other payment app, is what keeps a row from containing the wrong value.
What a PayPay Transaction History Entry Actually Shows
Open the PayPay app, tap the History icon (取引履歴) at the top of the home screen, and pick any completed payment. The entry you land on shows a set of fields that is consistent from transaction to transaction, even if the layout gets subtle refreshes with each app update.
At the top: the amount, displayed in yen with a ¥ prefix. Below it, or adjacent depending on the screen version: the store name (店舗名), often accompanied by the store's logo when the merchant has registered one with PayPay. Beneath that: the transaction date and time — formatted in Japanese standard YYYY/MM/DD HH:MM, always in Japan Standard Time (JST, UTC+9).
Then come two fields that set PayPay apart from every US or European payment app: the number of points (ポイント) earned on this transaction, and the payment method (支払方法) — which funding source the money actually came from. Below those, a transaction ID (取引ID) and a status tag that reads "支払い完了" (payment completed) in green.
These fields appear in the same region of the screen for every transaction, but their exact vertical order shifts slightly depending on whether the payment was made by scanning the merchant's QR code, having the cashier scan your barcode, or paying through an online checkout that redirected to the PayPay app. The amount and store name are always at or near the top. The points and payment method sit in the middle band. The transaction ID is at the bottom in the smallest type.
Amount, Date, and Store Name: The Three You Need
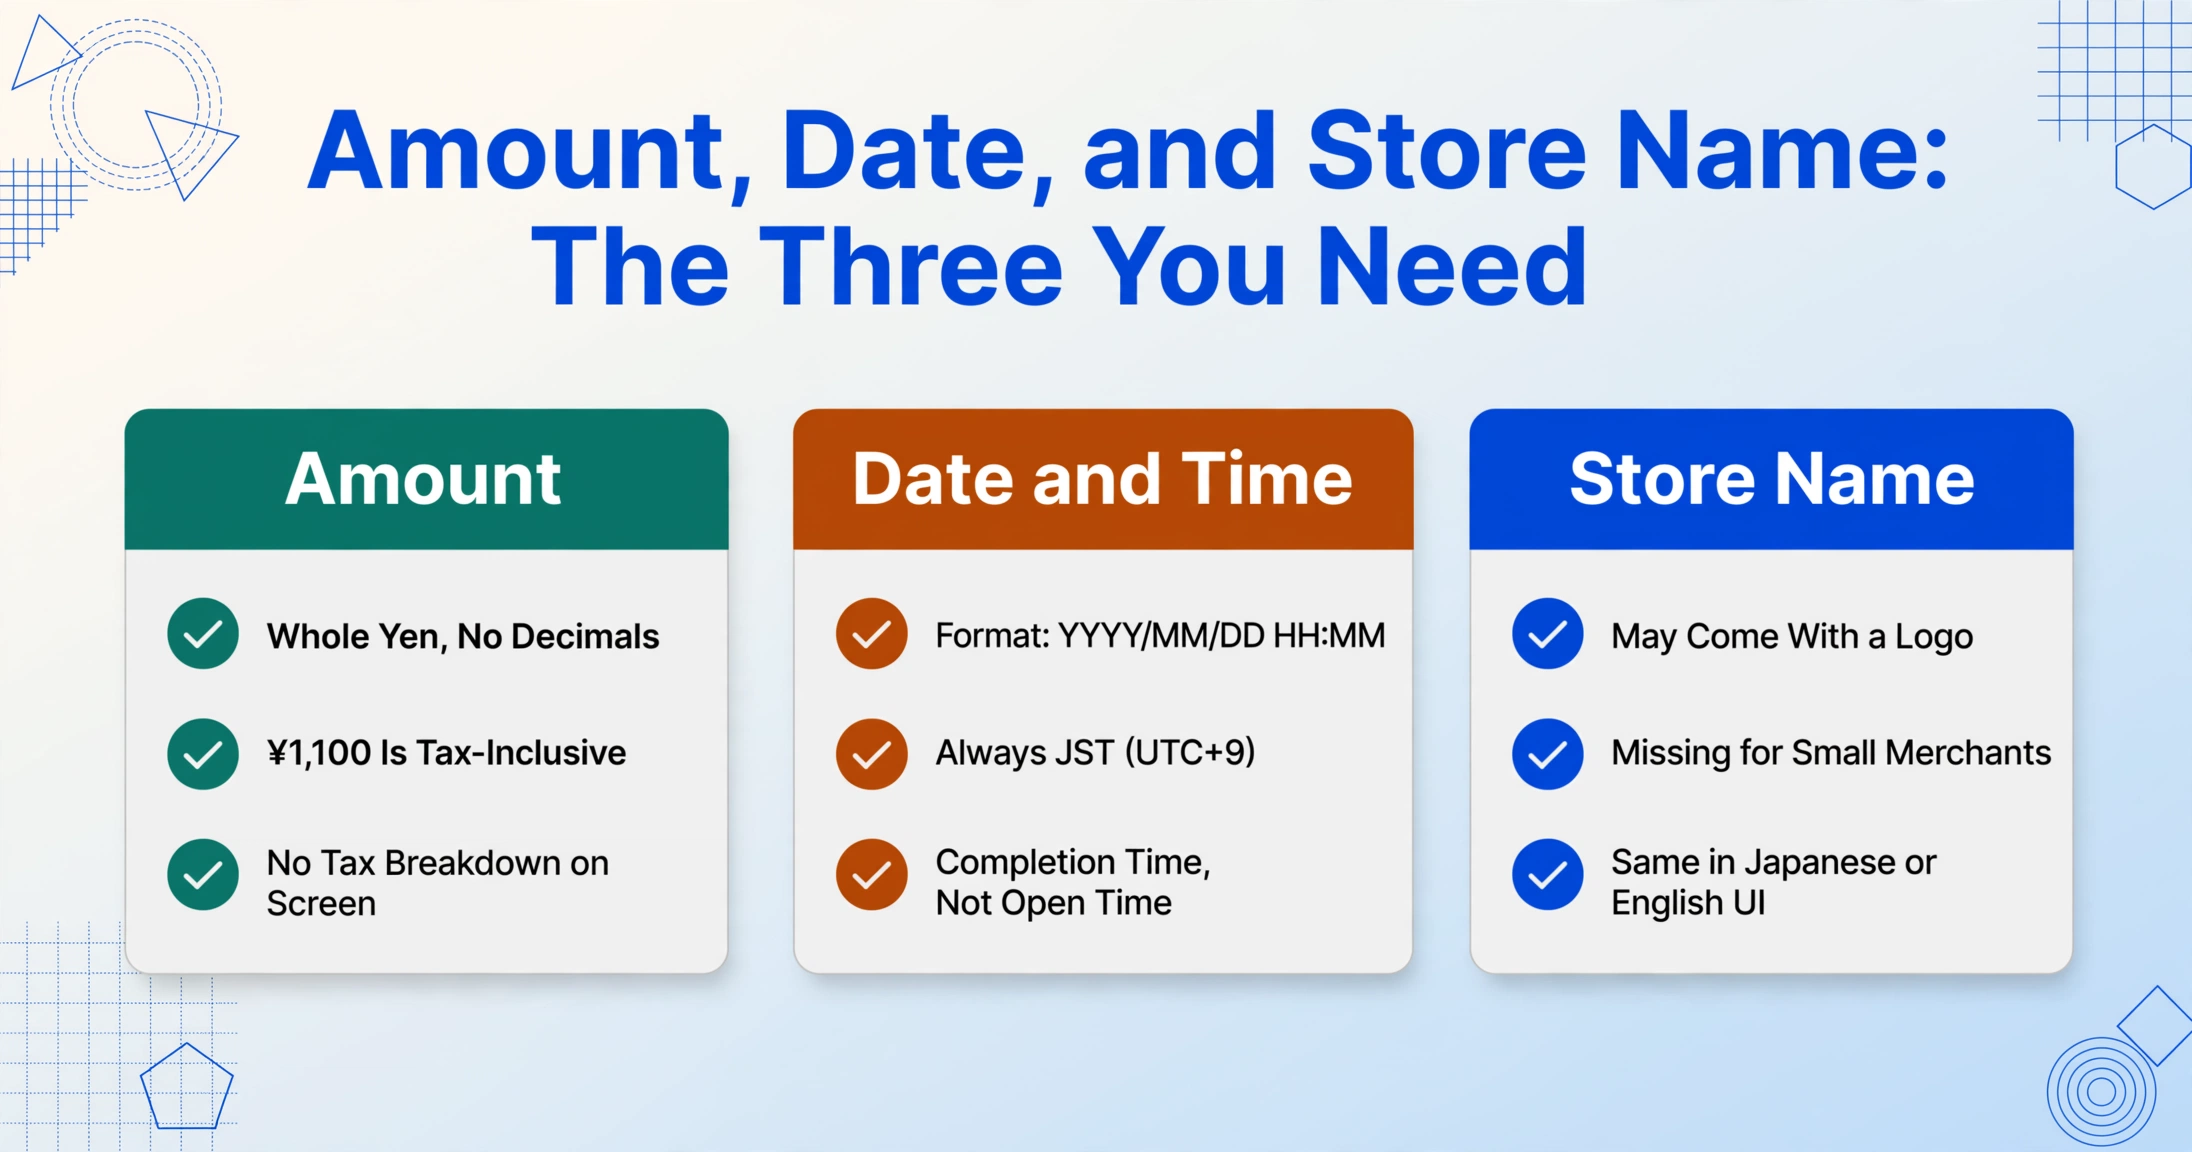
The amount is the most prominent element — the largest number on the screen, formatted as ¥1,234 without decimal places for whole-yen payments. If a tax-inclusive ¥1,100 payment was made, the screen shows ¥1,100, not ¥1,000. There is no tax breakdown or subtotal line on the PayPay transaction screen itself — the number shown is the final amount that left your balance. For any downstream use that needs a pre-tax figure (tax filing categories, expense reports that separate tax-inclusive from tax-exclusive amounts), you'll need to calculate backward — Japan's standard consumption tax rate is 10%, with a reduced 8% rate for food items (軽減税率). Whether a specific transaction qualified for the reduced rate depends on the store and what was purchased, and the PayPay entry doesn't label the rate. The amount is the amount.
The date and time are straightforward but have two things worth noting. First, the format is always Japan time — if you're an expat or remote worker filing taxes in a different timezone, the timestamp on your PayPay screenshot reflects when the transaction cleared in Tokyo, not local time at the point of purchase if you were traveling. Second, the time recorded is the payment completion time, not the moment you opened the app or the moment the cashier initiated the transaction. For end-of-month accounting where the cutoff matters — a transaction at 23:58 on the 31st vs. 00:02 on the 1st — the PayPay timestamp is definitive.
The store name is the field with the most variability, and it's worth understanding why before you log dozens of them. For major chains — convenience stores like Seven-Eleven and Lawson, supermarket chains like Seiyu, drugstores like Matsumoto Kiyoshi — the store name appears immediately after payment, often with the company's official logo. For smaller independent merchants, the name displayed is whatever the merchant registered with PayPay when they set up their account — which might be their legal business name, their trade name, or a romanized version that doesn't perfectly match the kanji on their storefront. In some cases, particularly with PayPay Card (credit card) transactions, the store name doesn't appear until the payment status changes from "accepted" (yellow screen) to "completed" (green screen) — a gap that PayPay addressed in June 2024 by letting users register a store name manually during the pending window. If your screenshot shows a generic placeholder or a name you don't recognize, check the status color in the top bar — yellow means the name may still resolve.
Points (ポイント) and Pay Method (支払方法): Two Fields Unique to PayPay
No payment app outside Japan shows you how many loyalty points you earned on a specific transaction — on the same screen. PayPay does.
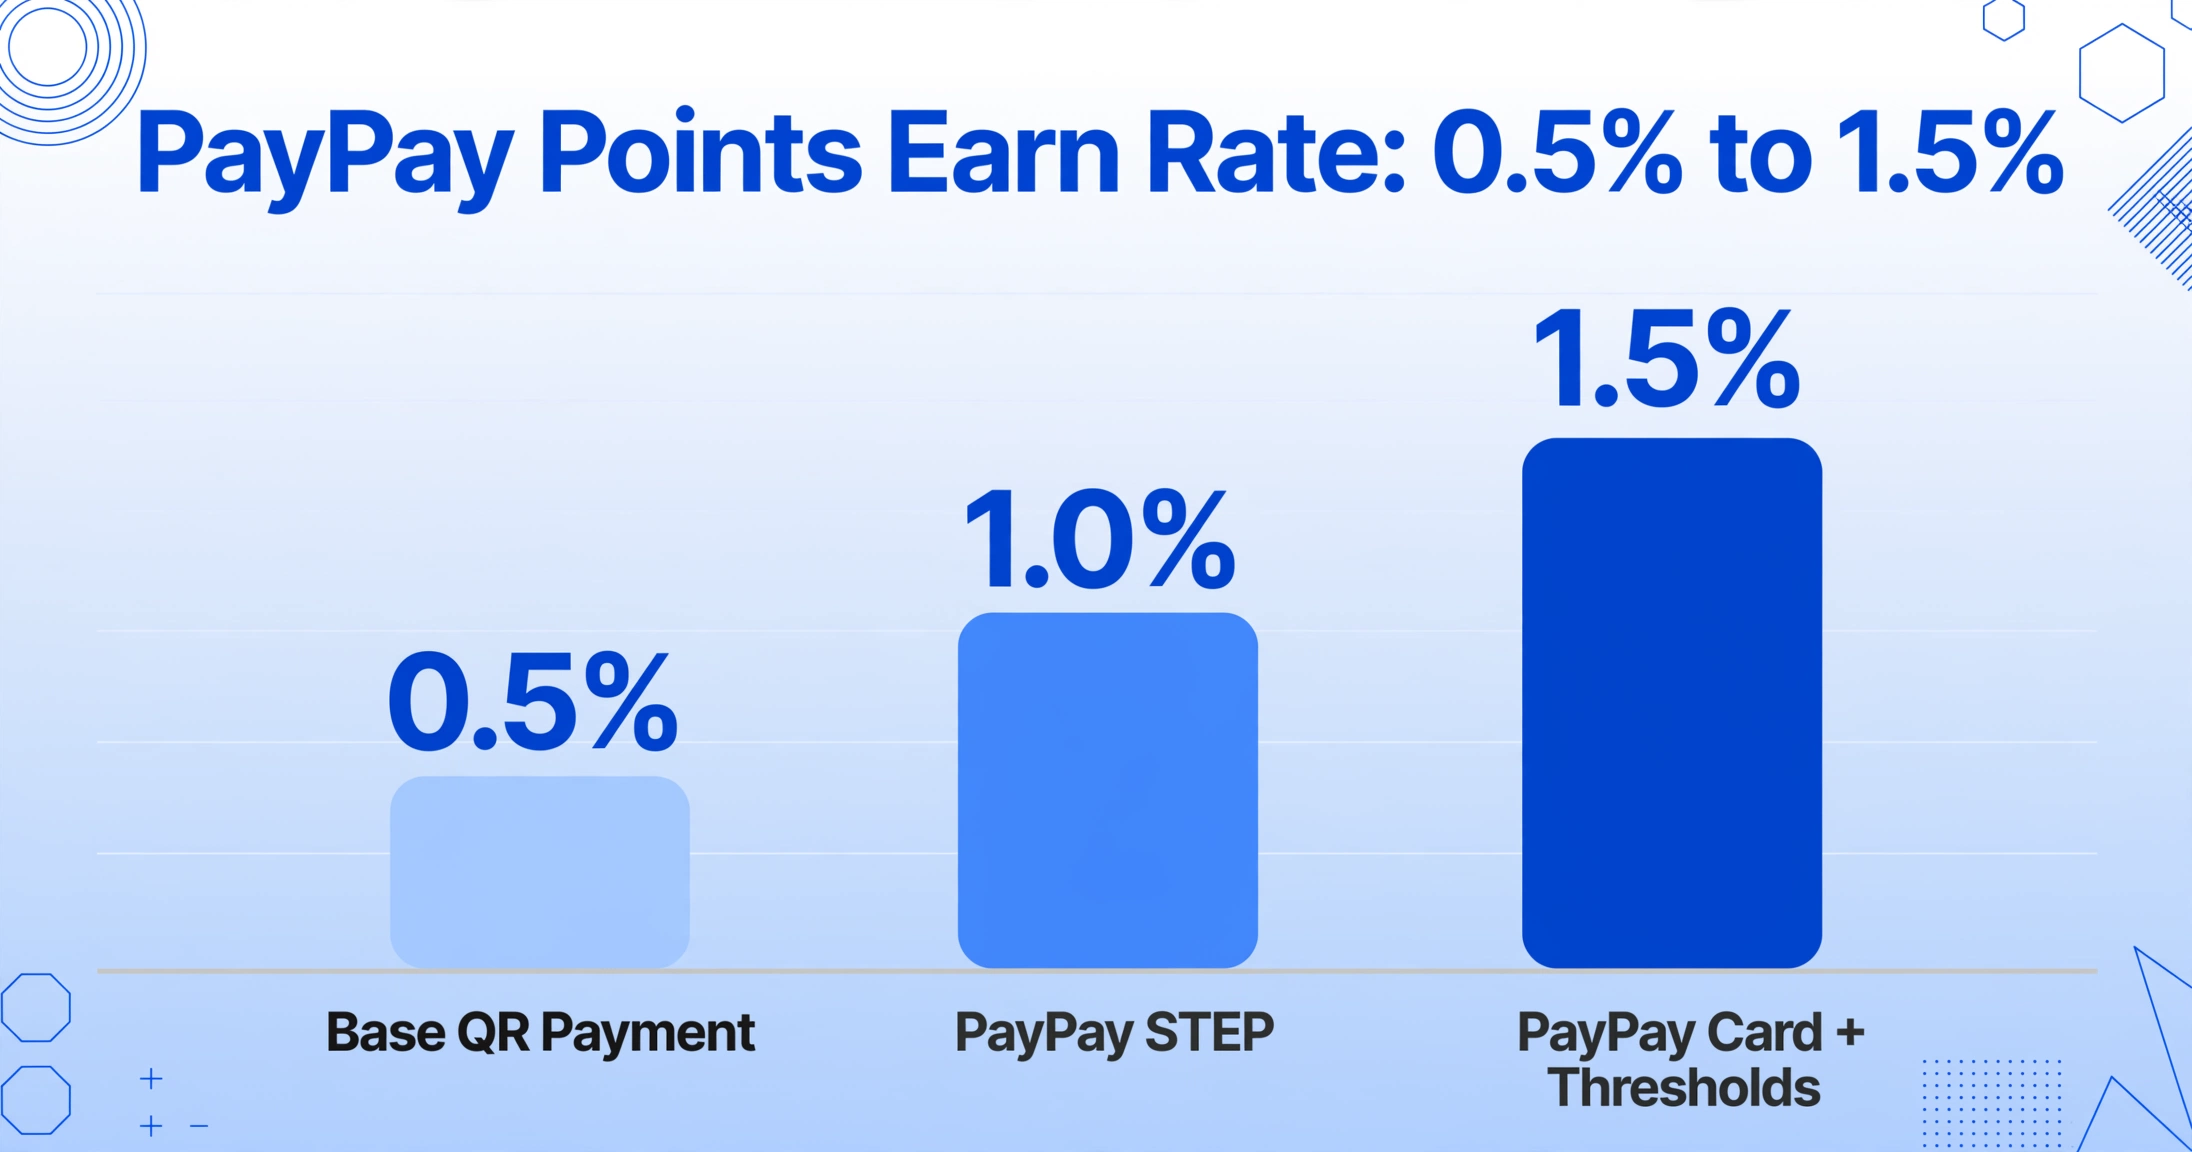
The points (ポイント) line on the transaction detail screen shows exactly how many points were granted for that payment. The base earn rate is 0.5% of the payment amount on QR transactions, but with PayPay STEP — a monthly activity-based boost program — the rate climbs to 1.0% and can reach 1.5% for users who also hold a PayPay Card and meet spending thresholds. A ¥2,000 lunch at Sukiya might earn 10 points at the base rate or 20 points with STEP active. Points are worth 1 yen each and have no expiration date (期限なし) — a policy that distinguishes PayPay from almost every other Japanese point system, where points typically expire within months.
The points figure on each transaction screen isn't just a running total. It's attached to that specific payment. If you're tracking total points earned across a month for cashback reconciliation, or if you need to separate a payment's net cost from the points value it generated, this field is the data point that makes that possible — and it exists on no other payment screenshot from any other platform.
The payment method (支払方法) field tells you which funding source was used: PayPay balance (PayPay残高), a linked bank account, PayPay Credit, PayPay Card, or a combination. This matters when a single PayPay account draws from multiple sources across different transactions — a common setup in Japan where users keep a small PayPay balance for daily spending and link a credit card for larger purchases. A batch of screenshots might contain transactions funded three different ways, and if you're categorizing expenses by payment method for budgeting or tax purposes, the 支払方法 line is how you tell them apart. Without this field — which no other payment app screenshot includes — you'd need to cross-reference each transaction against a separate bank or card statement.
Both of these fields are visual-only on the app screen. They are not included in the transaction CSV that PayPay introduced for download in February 2025 — the CSV gives you date, description, counterpart, and amount, but doesn't carry the points-per-transaction or payment method breakdown. If you need these two values, the screenshot remains the only source.
Files are processed securely and not stored.
This distinction — that the screenshot captures fields the official CSV doesn't — is the practical reason screenshot extraction matters for PayPay specifically. The same approach works across any payment app: WeChat Pay, Alipay, Venmo, PayPal. A single set of column definitions — Amount, Date, Store, Points, Pay Method — pulls data from screenshots across all of them, because the extraction reads what the data means, not which app's template it came from. Japan's other dominant mobile payment app, LINE Pay, uses a similar transaction history design and faces the same screenshot-to-spreadsheet gap, and Mercari's Merpay transaction screenshots fit the identical column set.
When a PayPay Screenshot Counts as a Receipt
In Japan, a PayPay transaction screenshot is treated as a valid supporting document for tax filing — with one condition: it must show the amount, the date, and the counterparty (store name). A Japanese tax accountant confirmed on Zeiri4.com that "PayPay transaction history screenshots can serve as a substitute for receipts during tax filing (確定申告)" — provided those three data points are visible. The same forum thread, and a separate discussion on Freee's tax advisory Q&A, confirmed that individual proprietors (個人事業主) filing blue-form returns (青色申告) regularly use PayPay screenshots as 経費 (business expense) documentation.
The Electronic Book Preservation Act (電子帳簿保存法) — revised in 2022 to require electronic storage of electronically-generated transaction records — means that saving PayPay screenshots as files isn't just acceptable. For transactions that generate only a digital record, it's the legally compliant way to store them.
Three common downstream paths where extracted PayPay rows replace manual entry:
Tax filing (確定申告): Japan's three dominant cloud accounting platforms — freee, MoneyForward Cloud, and Yayoi (弥生) — can import CSV transaction data, but PayPay's bank-link integration is limited compared to traditional bank accounts and credit cards. Many users manually enter PayPay transactions one by one. Extracting the fields from screenshots into a CSV — amount, date, store, optionally points and pay method — then importing into the accounting software removes the manual-typing step that otherwise fills a Sunday afternoon each February.
Expense claims (経費精算): Japanese companies that use Concur for expense management can link their PayPay account directly — PayPay added formal Concur integration, letting employees submit expenses with receipt photos attached from the transaction history screen. But for companies using other systems, or for employees whose company hasn't set up the Concur-PayPay link, the workflow remains: screenshot the transaction, type the values into the expense form, attach the screenshot as backup. Extracting the row from the screenshot means the expense form fields populate from data that's already in the image.
Household budget (家計簿): Japan's most popular personal finance apps — Zaim (which uses OCR to auto-categorize receipt photos) and MoneyForward ME (マネーフォワードME, which links to bank accounts and credit cards) — both face the same PayPay gap: they can't pull transaction data directly from the PayPay app because PayPay doesn't offer personal-use API access. The workaround, widely discussed on budgeting forums and Reddit's r/japanlife, is to screenshot the PayPay history and either feed it to the app's receipt-scanning feature or manually log each transaction. Zaim's receipt OCR reads a paper receipt, not a PayPay screen — the layout is different, and the points line confuses a traditional OCR engine expecting a standard thermal-receipt format.
From One Screenshot to a Spreadsheet of Transactions
One PayPay payment is simple. Open the app, look at the amount, done. But PayPay is used for everything — the 7-Eleven run, the ramen shop, the taxi, the utility bill paid by scanning the barcode on the paper invoice. At the end of a month, the transaction history in the app is a long scroll of individual entries, each one requiring a tap to open the details. Turning that scroll into columns you can filter and sum means extracting data from each entry one at a time — unless you go the screenshot route.
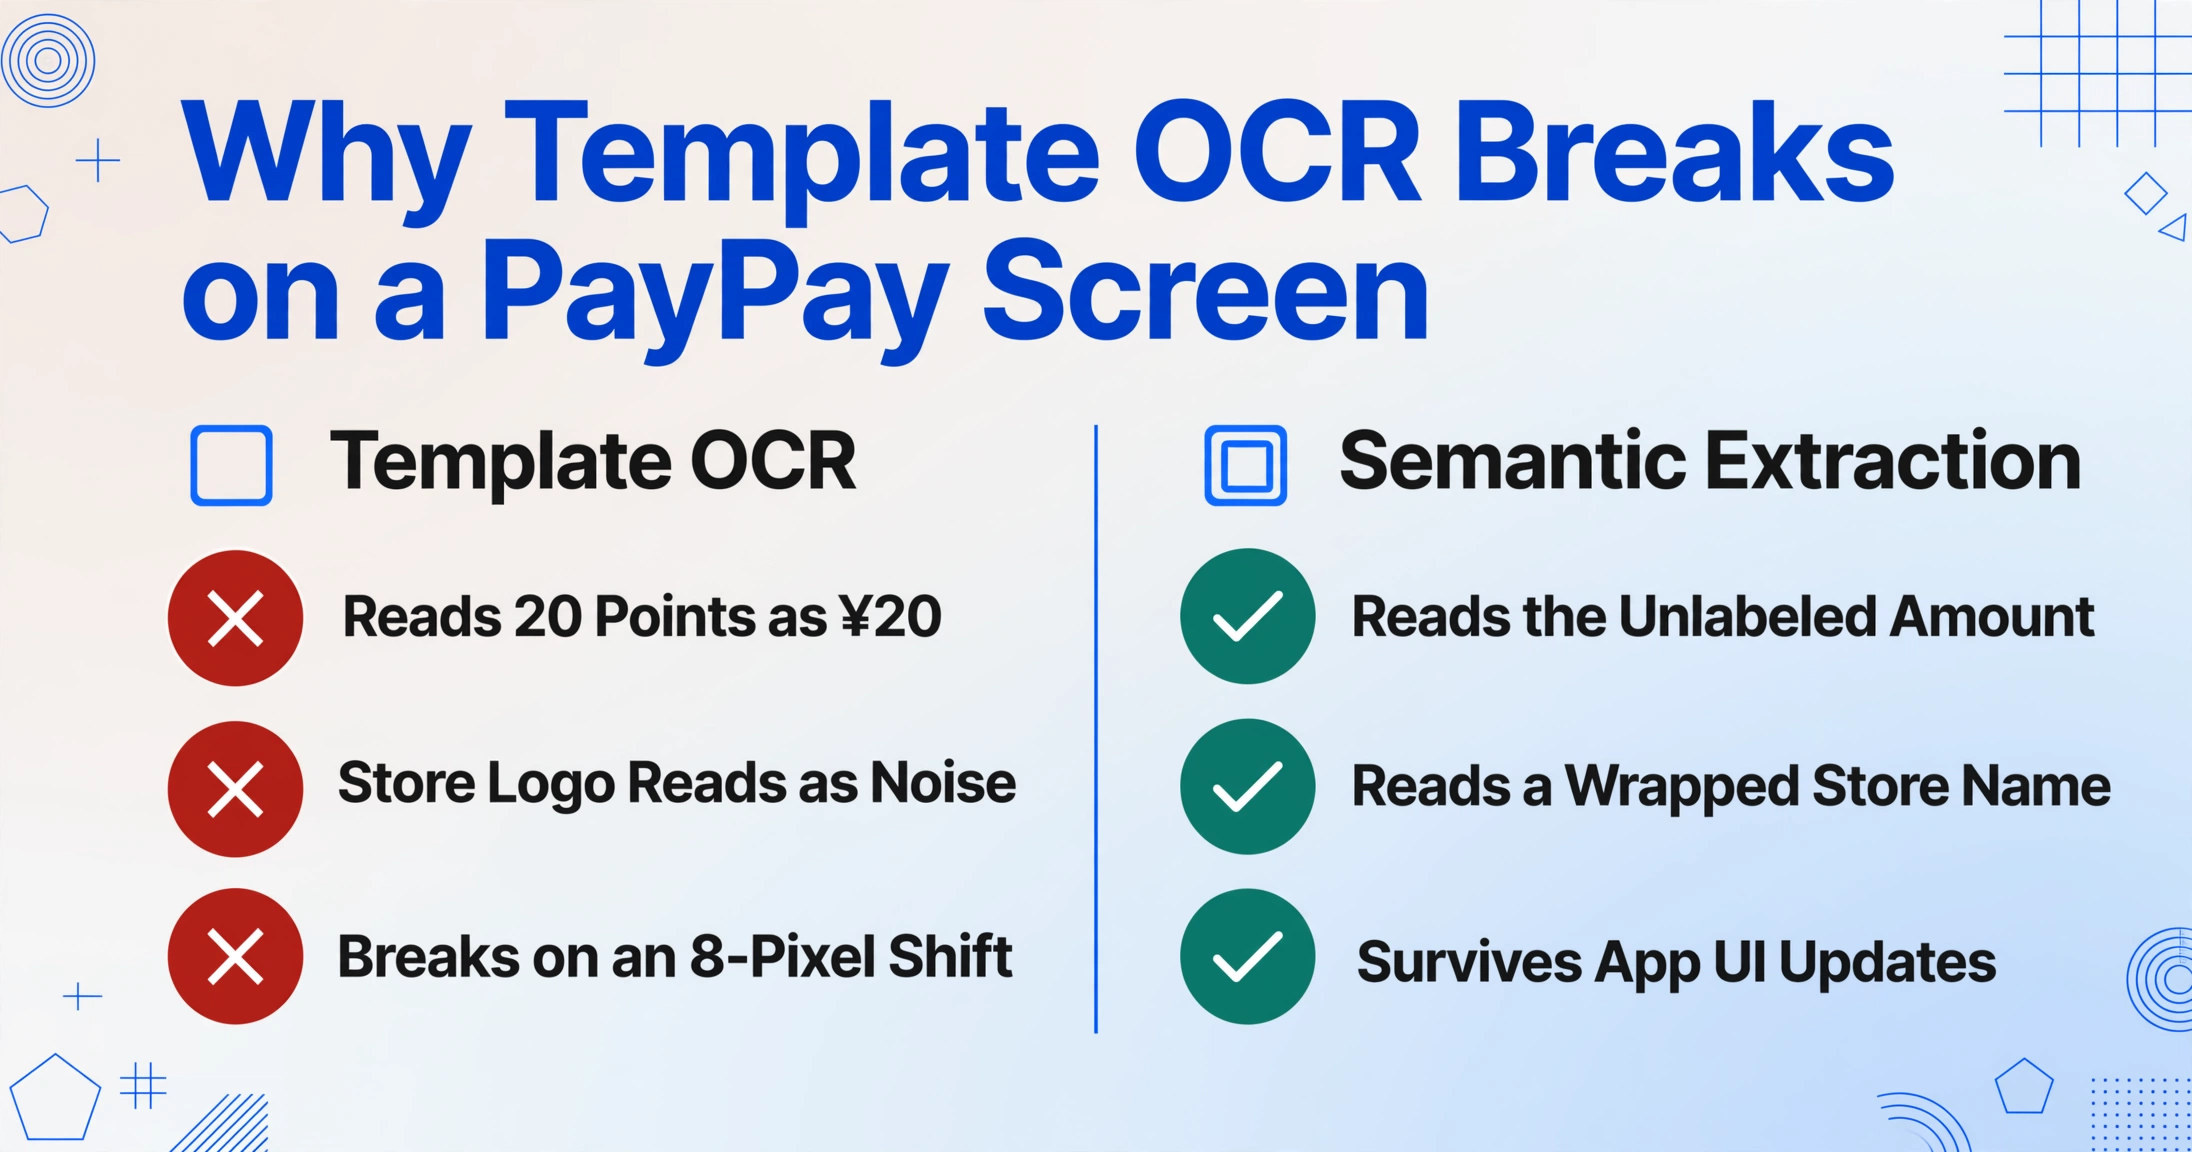
Traditional OCR — the kind that reads a receipt photo and pulls out numbers — doesn't map well to a PayPay screen. A paper receipt has a predictable structure: items, subtotal, tax, total, in roughly the same vertical order. A PayPay transaction entry is a mobile UI designed for glancing, not parsing. The amount sits at the top in large type but without a label. The points number is a standalone digit in the middle with a "P" icon — an OCR engine sees it as another currency amount and may record ¥20 when it's actually 20 points. The store name may appear next to a logo icon with no text label at all, and OCR sees the icon as noise.
Template-based extraction — drawing a bounding box around "the amount is here, the date is here" — breaks the moment PayPay pushes a UI update that shifts field positions by 8 pixels. Or when the store name wraps to two lines because it's longer than usual. Each variation is a broken template.
The alternative is semantic extraction: instead of telling the tool where to look, you tell it what concepts to find — "the payment amount in yen," "the date the transaction completed," "the registered store name," "the number of points earned." The extraction engine reads the screen the way a person would: it recognizes ¥2,480 as the transaction amount and 12P as the points earned, regardless of whether those two values are separated by three lines or five, and regardless of which app version produced the screenshot. The same column definitions work across every PayPay screenshot you have — and, critically, across screenshots from other payment apps too. A PayPay ¥1,200 lunch payment and a Line Pay ¥800 convenience store payment land in the same Amount and Date columns of the same spreadsheet, because the extraction is running the same semantic query on both.
For the recurring scenario — a foldered collection of PayPay screenshots at month-end that need to turn into one sortable table — the bottleneck is never the data. It's that the data lives in 30 individual images instead of 30 rows in one file. Getting the rows out is a problem of extraction, not entry.
FAQ
Can I just export PayPay transaction data instead of using screenshots?
PayPay introduced CSV download for transaction history in February 2025, covering the past two years of data. The CSV includes transaction date, description, counterpart, and amount — but it does not include points earned per transaction or the payment method used. If you need those two fields, the screenshot remains the only source. For users who only need the core three fields (amount, date, store), the CSV export works, but it requires logging into the app, navigating to the export menu, and waiting for the download — a multi-step process that screenshots (captured at the time of payment) bypass entirely.
Does a PayPay screenshot work across different app versions and UI languages?
Yes. The fields on the transaction detail screen — amount, store name, date, points, payment method — are the same set regardless of whether the app UI is set to Japanese or English. A ¥ symbol means the same thing whether the surrounding labels read "支払い金額" or "Payment Amount." The extraction reads the numbers, the store name text, and the date string from the image — the UI language around them doesn't affect the result.
If the store name is missing or generic, how do I identify the transaction?
A generic or missing store name — common when a small merchant hasn't registered a formal trade name with PayPay, or when a PayPay Card transaction is still in "accepted" (yellow) status — can still be identified from the combination of amount, date, and time. A ¥980 payment at 12:35 on a weekday to an unrecognized merchant name, combined with the transaction's location context (visible as a category tag like "コンビニ" or "飲食" on some transaction entries), is usually enough to confirm which store it was. If you're batch-extracting and the store name column shows a placeholder, the date and amount columns provide enough cross-referencing material to manually fill in the name later — one ambiguous store name in a spreadsheet is still faster than typing thirty transactions from scratch.