Extract Receipts into Google Sheets
Without Leaving Your Spreadsheet
MBO Partners' 2025 State of Independence study counts 72.9 million Americans working independently — freelancers, sole proprietors, contractors, side-gig earners. For most of them, expense tracking lives in Google Sheets: it's free, it's flexible, and they already know how to use it. The problem isn't the spreadsheet. The problem is the five-step loop required to get a single receipt into it: download the file, open it, read the values, type them cell by cell, paste the receipt photo or link somewhere you can find it later. At 30 receipts a month, that loop eats anywhere from 30 to 90 minutes of pure transcription. This article is about breaking the loop — with a sidebar add-on that keeps the spreadsheet, keeps your existing column structure, and removes the steps between "I have a receipt" and "it's in my sheet."
The 5-Step Loop That Eats Your Friday Afternoon

Here's what getting a single receipt into your expense spreadsheet actually looks like when you do it by hand:
Step 1 — Find the receipt. Maybe it's in your email (a forwarded PDF from a vendor or an Amazon order confirmation). Maybe it's on your phone (a photo you took at the checkout counter). Maybe it's still crumpled in your wallet from Tuesday.
Step 2 — Open it. PDFs open in a browser tab or Adobe Reader. Photos open in a preview app. Neither app is Google Sheets, so you're already in the wrong place.
Step 3 — Read the values. Scan the receipt for the merchant name, the date, the total amount, the tax, any line items you need. For a Home Depot receipt, that's 3 inches of thermal paper with SKU codes, quantities, and prices scattered across multiple lines. For a restaurant receipt, that's a tip line, a subtotal, and a total that may or may not include tax.
Step 4 — Type them. Switch to Google Sheets. Click into the Date cell. Type. Click into the Vendor cell. Type. Click into the Amount cell. Type. Repeat for every field, every receipt. According to the NSBA, the majority of small business owners spend over 20 hours per year dealing with federal taxes alone — and that's before you count the weekly expense logging that feeds into those tax calculations (NSBA 2024 Taxation Survey).
Step 5 — File the receipt image. Upload the photo or PDF to a Drive folder so you have it if the IRS asks. Name it something you can search for later.
No single step is hard. But multiply this by 30 receipts per month, and the friction compound: 150 steps, 30-90 minutes of transcription, and a spreadsheet that's only current until lunch.
The reason so many small business owners start a receipt spreadsheet in January and abandon it by March is not that the spreadsheet is wrong. It's that the data entry makes the spreadsheet unsustainable. In June 2025, the NFIB reported that 19% of small business owners ranked taxes as their single most important business problem — and the root of tax stress isn't calculating the bill; it's proving every deduction with organized records (NFIB Small Business Optimism Index, June 2025).
What Changes When Extraction Moves Into the Sidebar
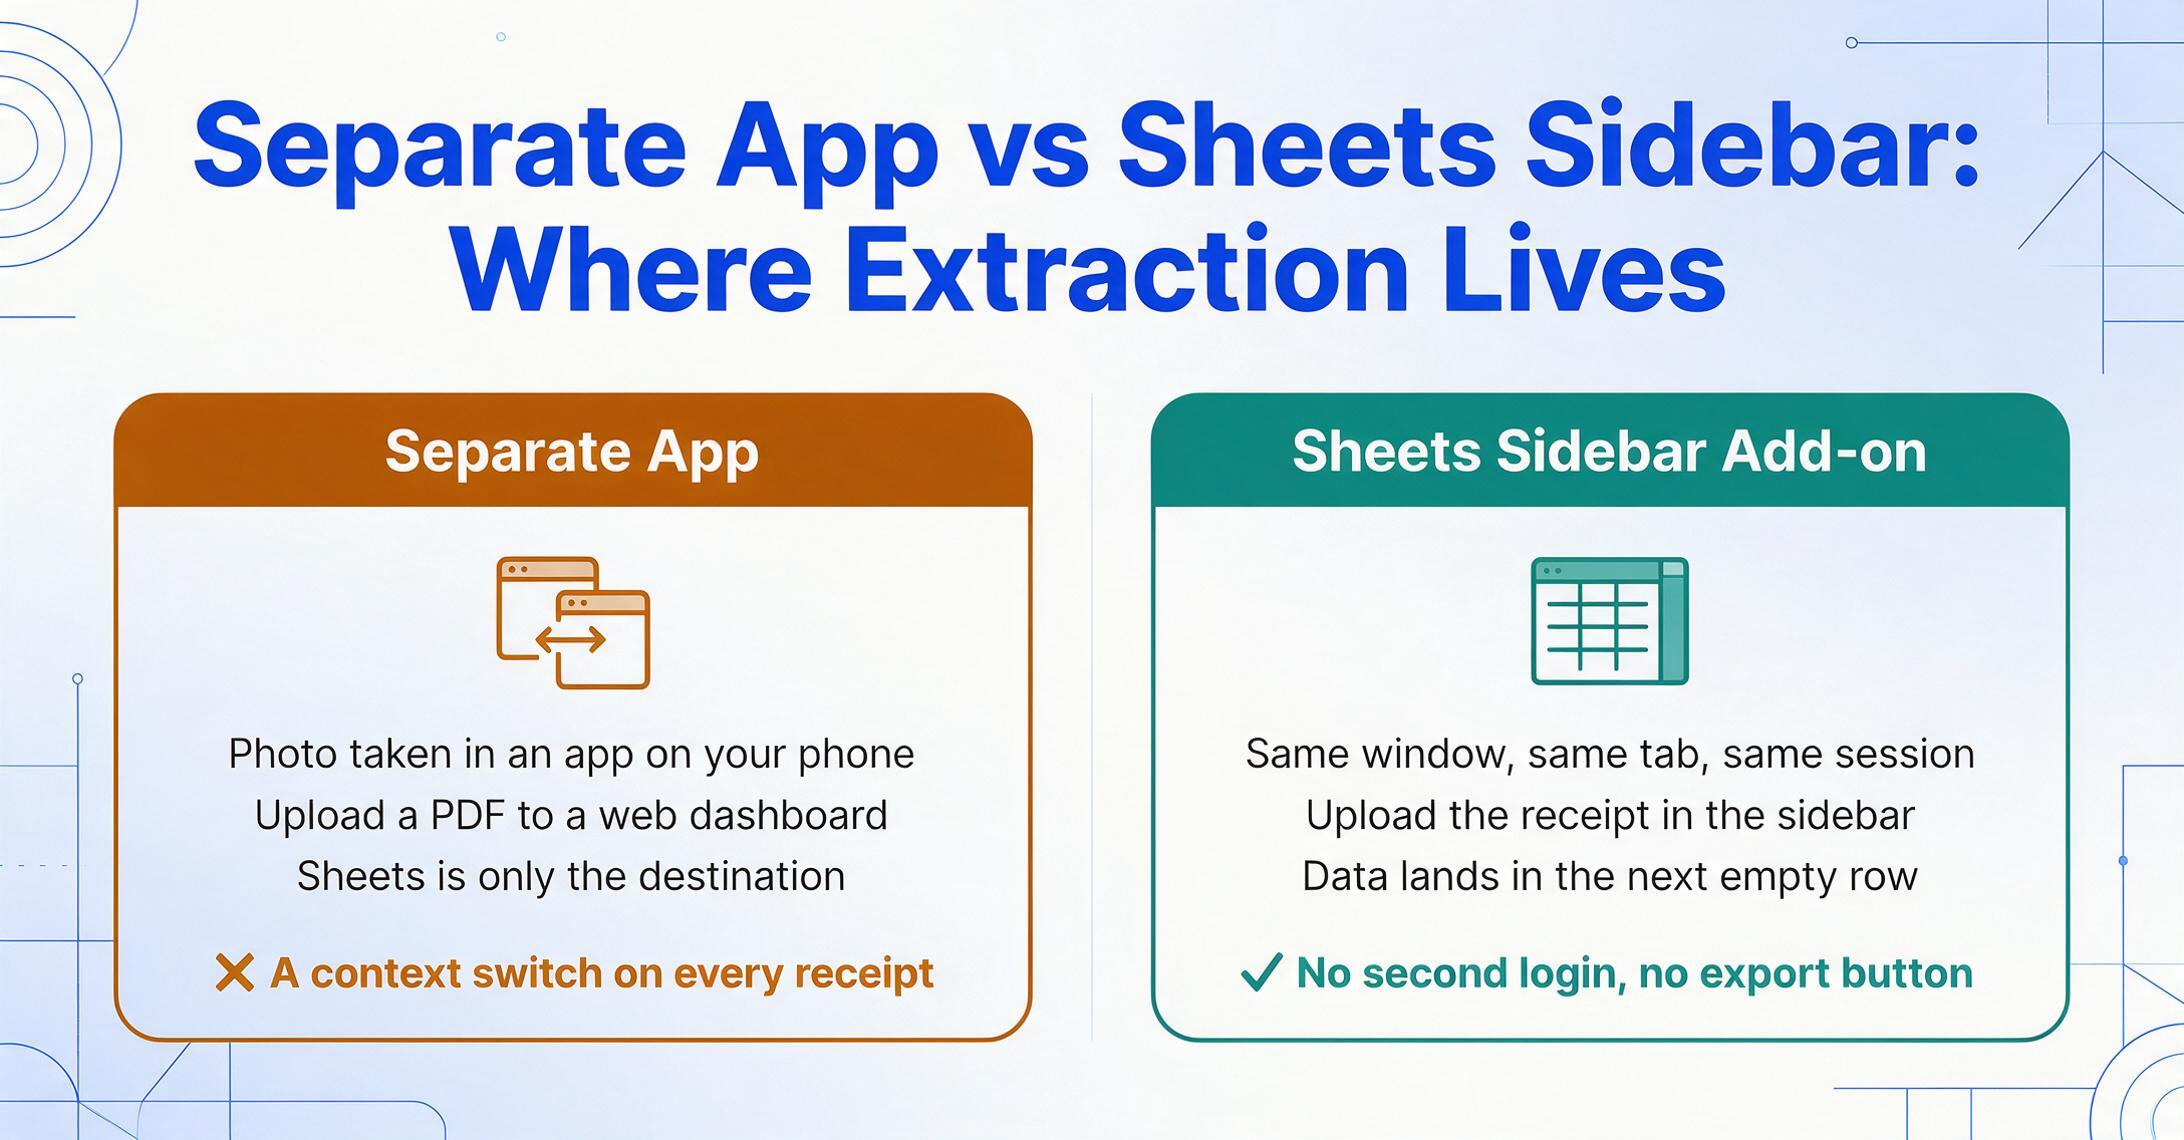
Most receipt-to-sheets tools share the same architecture: a separate app that processes your receipts and then syncs the results to Google Sheets. You take a photo in an app on your phone. You upload a PDF to a web dashboard. The data flows into Sheets as a destination. This works — but it still requires context-switching between tools. You live in Sheets. The extraction lives somewhere else.
A Google Sheets add-on flips that relationship. It's not a separate app that sends data to your sheet. It is a sidebar panel inside Google Sheets — a narrow pane that opens on the right side of your spreadsheet, accessible from the Extensions menu. When you install it, it becomes part of your Sheets environment: same window, same tab, same session. There is no second login, no separate dashboard to check, no export button to click. You open the sidebar, upload a receipt, and the extracted data appears in the next empty row of whatever sheet is currently active. For the full capability rundown — supported field types, formats, and plan details — see the Google Sheets add-on details, or the receipt-specific version for a walkthrough built around date, merchant, amount, and category columns.
This distinction matters because it eliminates the second-worst friction in receipt management. The worst friction is typing numbers by hand. The second-worst is leaving the tool where your numbers already live. If your expense tracking system is a Google Sheet — with columns you named, formulas you wrote, and a monthly summary tab you built — every tool that asks you to first process receipts elsewhere and then "export to Sheets" is adding a tool you didn't ask for to a workflow you already have.
The add-on architecture eliminates the download-and-import step. Receipt goes in the sidebar. Data comes out in the sheet. Nothing leaves the tab.
Setting Up Your Receipt-to-Sheets Pipeline
The setup takes under five minutes and requires no template configuration. There are no receipt templates to build because the add-on uses column-name extraction: instead of defining bounding boxes around each field or training a model on sample receipts, you type the field names you want — "Date," "Vendor," "Amount," "Category" — and the AI reads each receipt to find those values wherever they appear. This is the mechanism that makes per-store templates unnecessary. A Home Depot receipt and a restaurant receipt have nothing in common visually, but both contain a date, a vendor name, and a total amount. Column-name extraction searches for what those values mean, not where they sit on the page. (For a deeper explanation of why template-based approaches struggle with receipts specifically, see our article on the receipt format variety problem.)
Here's the three-step workflow:
1. Name your columns. In the add-on sidebar, type the field names that match your spreadsheet's existing column headers. If your sheet tracks Date, Vendor, Description, Amount, and Category, type those exact names. The column names you enter become the fields the AI searches for in each receipt. You can also skip naming columns and let the AI auto-detect what's on the receipt — useful for receipts you haven't categorized yet.
2. Upload receipts. Drag a photo or PDF into the sidebar, or click to browse. The add-on accepts JPG, PNG, WebP, and PDF — whether it's a crisp digital invoice, a photo of a thermal receipt taken with your phone, or a screenshot of an online purchase confirmation. You can upload one receipt at a time or batch multiple files for end-of-week processing.
3. Data lands in your sheet. Hit extract. The AI reads each receipt, locates the values corresponding to your column names, and appends them as a new row at the bottom of your active sheet. The column order matches what you specified in the sidebar. Your existing formulas, conditional formatting, and pivot tables stay intact — the new row is just the next row in the same structure.
That's the entire loop: sidebar open → upload → data in sheet. Three steps instead of five, and none of them involve your keyboard.
Files are processed securely and not stored.
What the Sidebar Add-on Unlocks Beyond Less Typing
Reducing typing time is the obvious benefit. But the add-on workflow changes a few things that aren't immediately obvious from a feature list.
Error rate drops without quality control effort. Manual data entry has a well-documented baseline error rate of roughly 1-4% per field — one typo every 25 to 100 keystrokes. On a receipt with four fields (vendor, date, amount, category), that means roughly one in six receipts has at least one transcription error. Transcribe 30 receipts, and you'll have about five errors to catch. Extraction reduces the error surface from "every keystroke" to "verify once per receipt." You're reviewing output instead of producing it — which is a different, faster cognitive task.
Column consistency makes pivot tables and tax prep possible. The value of an expense spreadsheet is in what it can show you — a pivot table of spending by category, a filter for all "Office Supplies" purchases, a SUM for Q2 deductions. Those analyses only work when data is structured consistently. When you type manually, "Starbucks" on Tuesday becomes "strbcks" on Thursday, and "12.99" becomes "12,99" depending on which device you're typing on. Extraction enforces column-level consistency without you having to think about it.
IRS-compliant digital records, built in. The IRS doesn't require paper receipts. IRS Publication 583 explicitly states: "All requirements that apply to hard copy books and records also apply to electronic storage systems." A digital copy of a receipt is acceptable as long as it's legible, complete, and retrievable. The sidebar add-on's workflow — upload receipt, extract data, keep the original file — naturally produces the documentation the IRS expects: a structured expense log (your sheet) paired with the corresponding supporting documents (the receipt images you uploaded). When you need to prove a Schedule C deduction, both pieces are in the same place.
The standard IRS recommendation is to keep records for three years from the filing date, though employment tax records should be kept for four years and records involving substantial income omission for six. In practice, a seven-year retention window is the safest default — and digital records don't fade like thermal paper does.
Comparing Your Options for Getting Receipt Data Into Sheets
The number of ways to move receipt data into a spreadsheet has grown significantly in the last two years. Here's how they stack up, with the understanding that the "best" option depends on your existing workflow and how much you value staying inside your sheet:
| Method | Steps Per Receipt | Leaves Sheets? | Monthly Cost | Setup Time | Best For |
|---|---|---|---|---|---|
| Manual typing | 5-6 | Yes (to open receipt) | Free | Minutes to build a sheet | Under 10 receipts/month |
| Mobile app + sync (Expensify, ReceiptSync, etc.) | 3-4 | Yes (photo captured in separate app) | $0–$18/month | 30-60 min (account setup + sheet connection) | High-volume mobile users, teams with reimbursement flows |
| Automation workflow (Zapier, n8n, Make) | 1-2 (after automation is built) | No (runs in background) | $0–$30/month | 2-4 hours to build and test | Technically adept users with predictable receipt sources (email, Drive folder) |
| Google Sheets sidebar add-on | 3 | No | Varies by tool | Under 5 minutes | Users who already track expenses in Sheets and want to stay there |
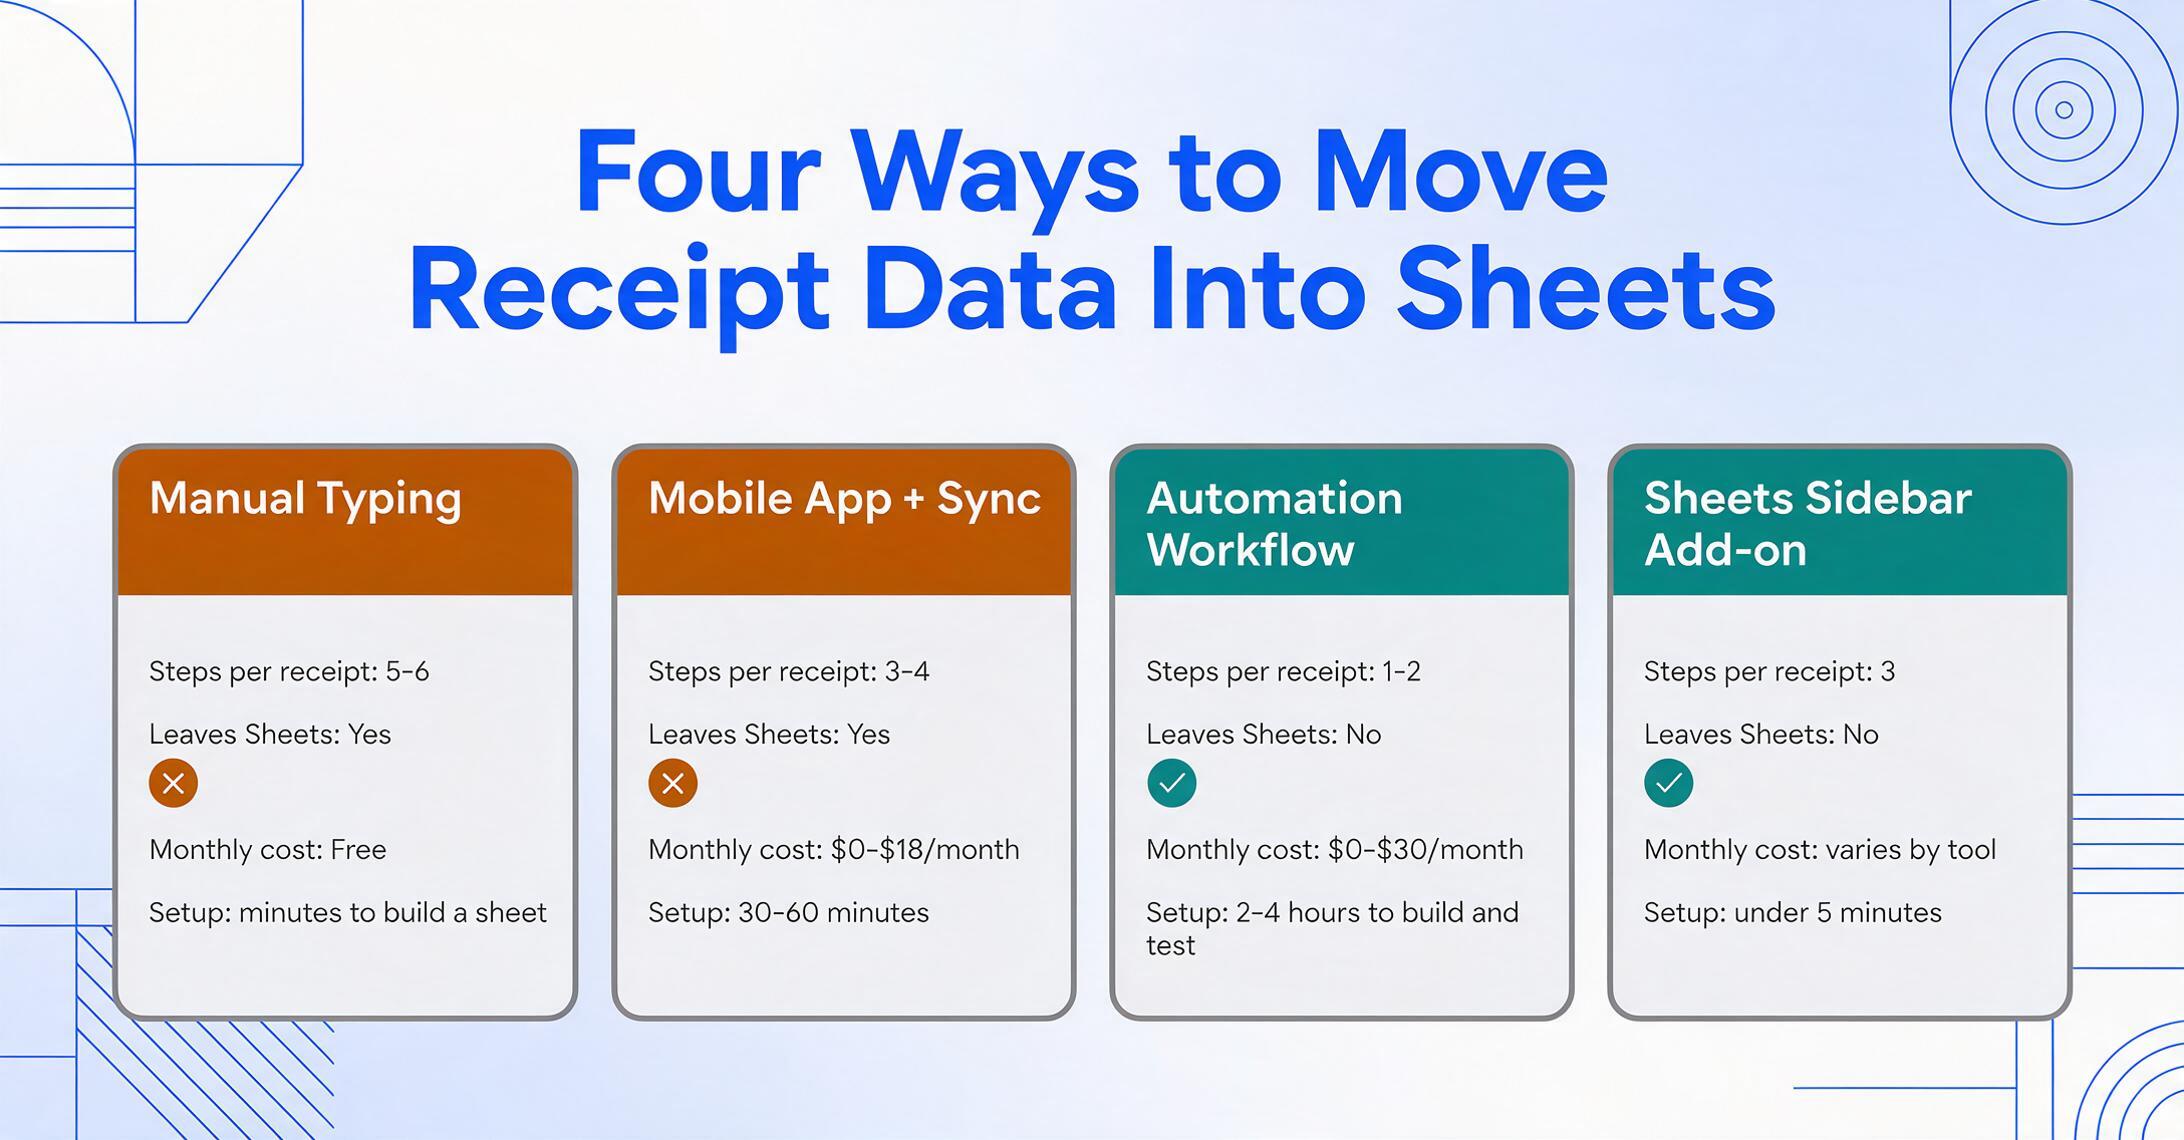
The trade-off isn't purely about step count. Mobile apps win on convenience when you're physically collecting paper receipts at a point of sale — the photo happens at the moment of purchase, and the extraction can happen later. Automation workflows win when your receipts arrive predictably (all to the same email address or the same Google Drive folder) and you're comfortable with initial technical setup. The sidebar add-on wins when your primary constraint is that you don't want to add another tool to your workflow — when the spreadsheet is the system, not just the destination.
For freelance workers — who the MBO Partners study found make up a growing and increasingly permanent segment of the U.S. workforce — the tools they're already using include QuickBooks Self-Employed ($20/month), FreshBooks ($15/month), Wave (free), and Expensify ($5/month). None of these are bad tools. But all of them require migration: move your data, learn a new interface, adapt your categories to a new system. The sidebar add-on path is about extraction without migration. If you already have a sheet that works, you keep it.
Frequently Asked Questions
Does the add-on work with faded or crumpled receipts?
It depends on legibility. If you can read the vendor name and total amount by eye, the AI can typically read them too. Severely faded thermal receipts where the text has turned white or receipts with significant physical damage may produce partial or inaccurate results. For best results, photograph receipts soon after purchase while the print is still sharp.
Can I extract data from multiple receipts at once?
Yes. The add-on supports batch upload — select multiple files in the sidebar and all of them will be processed. Each receipt gets its own row in your sheet, and all rows append to the same column structure. This is particularly useful for end-of-week or end-of-month catch-up sessions.
What happens if the AI misreads a field?
The extracted data appears directly in your sheet, so you can review and edit it just like any other cell. There's no separate review interface to learn — if the vendor name came through with a typo or the amount missed a decimal place, you correct it in the cell and move on. The add-on doesn't lock your data behind a proprietary review screen.
Can I use this if I file a Schedule C with the IRS?
Yes. The data extracted into your sheet — vendor names, dates, amounts, categories — maps directly to the expense line items on Schedule C (Form 1040). Common Schedule C expense categories (advertising, supplies, travel, meals, office expenses) are exactly the kind of categories you'd set as column values or filter by. Combined with digital receipt images stored alongside your spreadsheet, you have the two things the IRS needs: a summary of transactions (your sheet) and supporting documents that substantiate them (the receipt files).
Does the add-on replace accounting software like QuickBooks?
No. The add-on handles one step in your financial workflow: getting receipt data from an image or PDF into a structured format. It doesn't do double-entry bookkeeping, bank reconciliation, invoicing, or payroll. Think of it as the extraction layer that sits between your receipts and whatever system you use downstream — whether that system is Google Sheets, a folder of CSVs you import into QuickBooks at month-end, or your accountant's inbox.
What formats can I upload?
JPG, PNG, WebP, PDF, and AVIF. This covers photos taken with your phone, downloaded digital receipts, email attachments, and screenshots of online order confirmations.
If you've been typing receipts into Google Sheets cell by cell, the bottleneck isn't your speed — it's the loop. Three steps replaces five. That's what the add-on changes. Try it on this week's receipts and see if the spreadsheet that works for you stays current longer than January.
Try the Google Sheets Add-on