How to Reconcile Flight Itinerary Data
Without the Manual Entry
The employee is back from the client site, and the flight itinerary PDF is sitting in your queue — flight numbers, departure and arrival airports, a fare breakdown, tax lines, a 13-digit ticket number. Every field your travel and expense (T&E) process needs is on the page, and someone still has to retype it into the expense system. Business travel is not a small-volume problem: the Global Business Travel Association (GBTA) projects 1.84 billion business trips in 2026 and a record $1.71 trillion in global spending. The itinerary is the receipt for the largest single line on most T&E budgets, and it was never designed to be read by software — which is exactly why manual entry survives there. Approval paperwork sits upstream of every one of those receipts, so converting a travel authorization to Excel gives finance the approved dates and cost estimates the itinerary is later reconciled against.
Key Takeaways
- Rekeying flight data from a multi-segment itinerary into an expense system costs at least three minutes — and the itinerary receipt is the one T&E document with no allowance shortcut.
- Each airline prints the same fare, tax, and ticket-number data in a different layout — a position-based template dies on the second itinerary, and every mistyped ticket number erodes your IRS accountable-plan substantiation.
- Name your columns once — Record Locator, Total Paid, Ticket Number — and the same set reads any airline's itinerary by field meaning; the fare split that no card charge shows lands in the spreadsheet in a single pass.
What's Actually on a Flight Itinerary
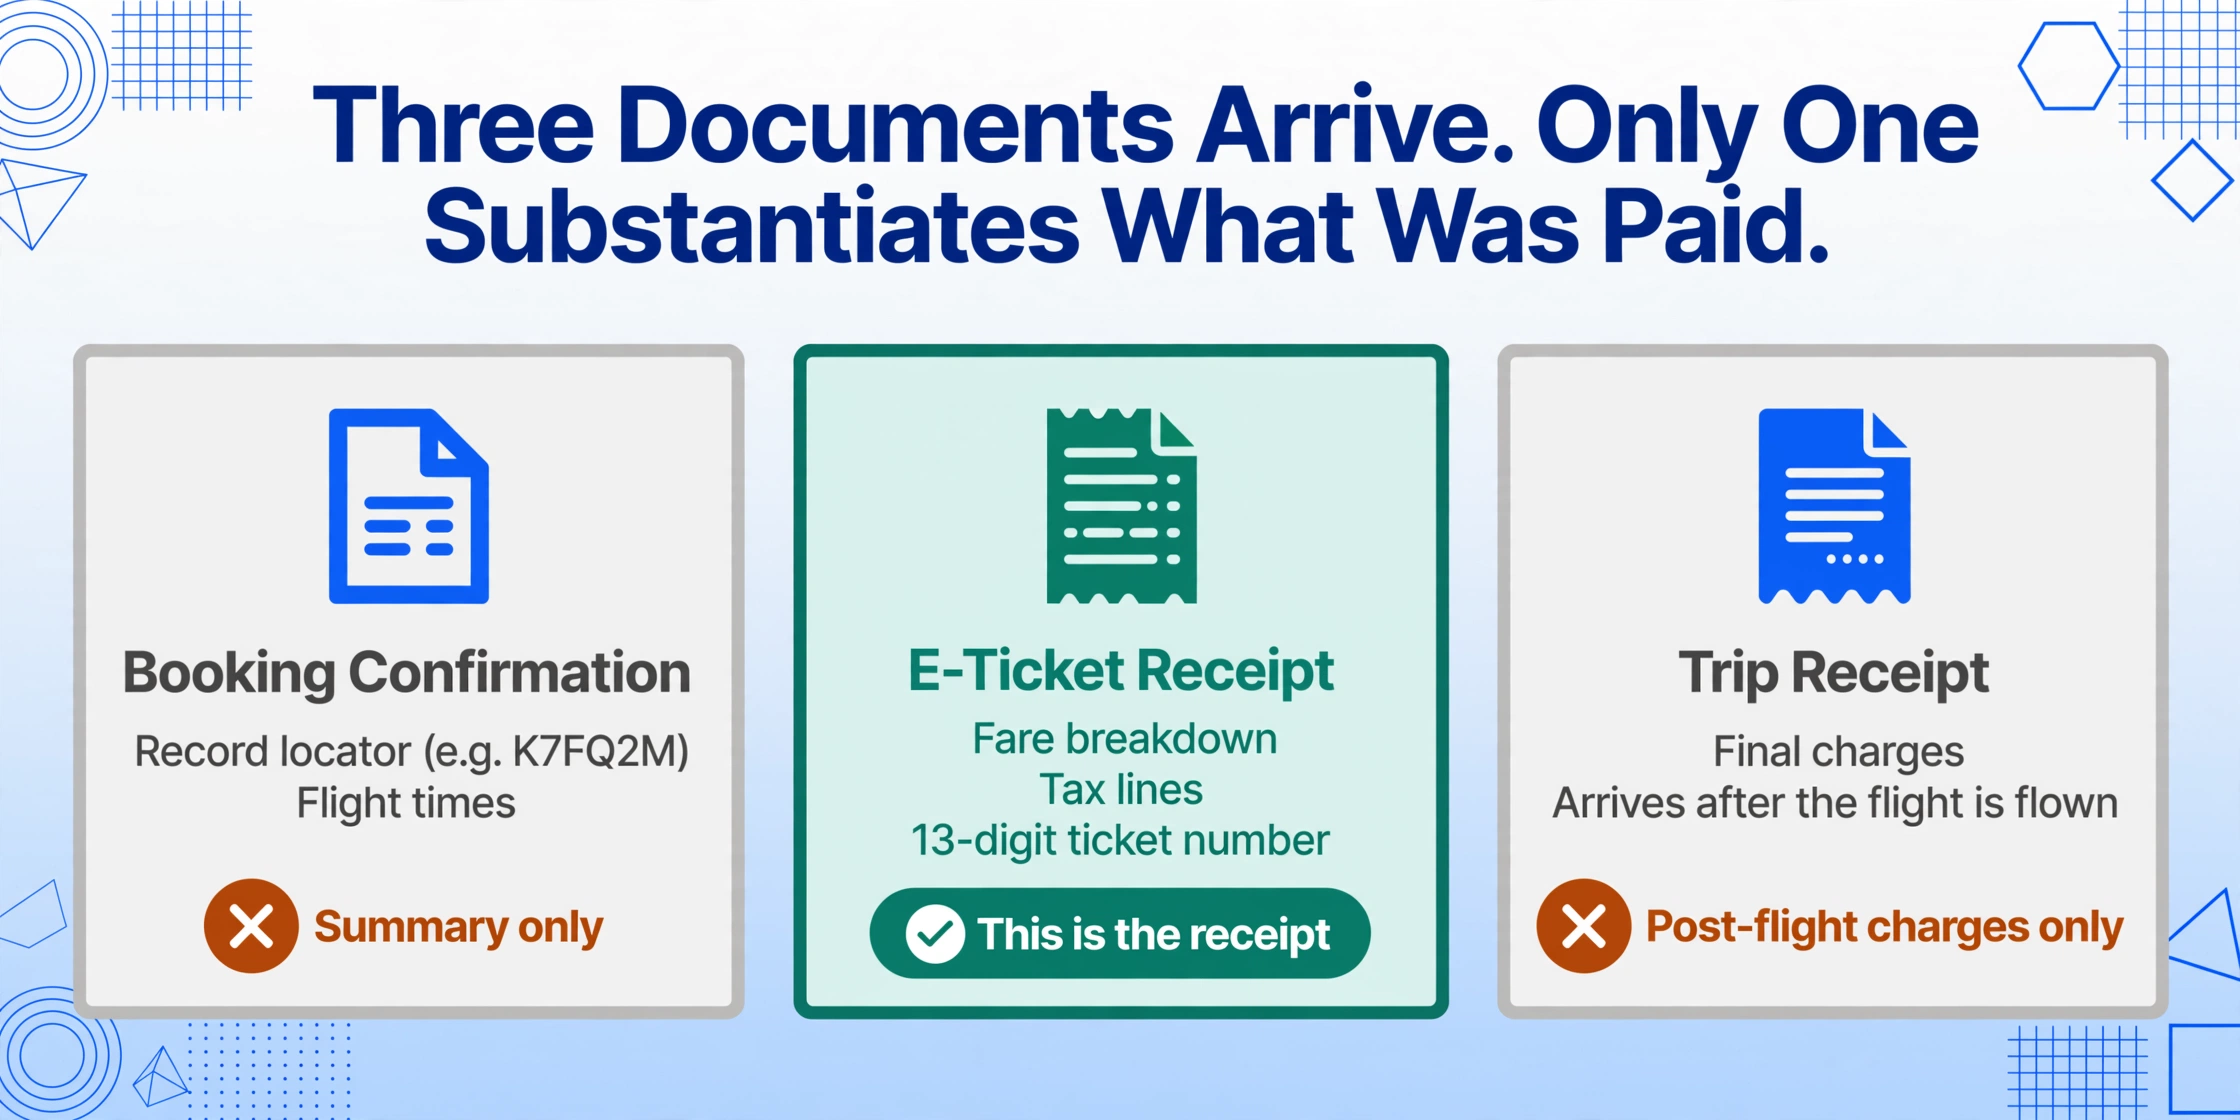
An e-ticket itinerary receipt contains every field your expense process needs — the problem is that it is formatted for a traveler, not for a spreadsheet. Before you can extract anything, it helps to know which of the three documents airlines send counts as the receipt: the booking confirmation (an itinerary summary with the record locator and flight times), the e-ticket receipt (the fare breakdown, tax lines, and the 13-digit ticket number), and the trip receipt (final charges after the flight is flown). For expense reconciliation, the e-ticket receipt is the document that matters — it is the one that substantiates what was paid. The boarding pass is the travel-day companion to all three, carrying passenger name, flight number, gate, boarding time, and seat — and it has its own boarding pass screenshot extraction walkthrough when those fields need to land in a sheet.
The fields on that receipt are standardized by the airline industry's reservation infrastructure, even though the page layouts are not. Each booking carries a record locator (also called a PNR, for passenger name record) — a six-character reference like "K7FQ2M" that ties the itinerary, the ticket, and the payment together across airline systems. Around it sit the data points your T&E process actually consumes:
| Field | What it is | Why T&E needs it |
|---|---|---|
| Record locator (PNR) | 6-character booking reference | Cross-references the booking tool, the airline, and the card charge |
| Passenger name | Name as printed on the ticket | Matches the traveler and the cardholder |
| Flight number & date | e.g. UA 123, 2026-09-14 | Substantiates the time element of the expense |
| Origin / destination airports | e.g. SFO – ORD | Substantiates the place element |
| Booking class / fare basis | e.g. "V", "LSA21V" | Policy check on premium cabins and refundable fares |
| Base fare | Price before taxes and fees | The number most card charges never show |
| Taxes & fees breakdown | Security, airport, carrier-imposed lines | Explains why the card charge never equals the advertised fare |
| Total paid | Fare + taxes + fees | Matches the corporate card or reimbursement transaction |
| Ticket number | 13-digit e-ticket number | The audit-trail anchor for refunds, changes, and disputes |
| Baggage allowance | Checked bag rules for the fare | Justifies separately paid bag fees |
Here is the catch that keeps this data trapped: there is no industry-standard page layout. IATA defines the data in a PNR, but each airline, global distribution system (GDS), and booking tool renders its own document. A United e-ticket receipt does not look like a Delta one, which does not look like the itinerary your Concur Travel booking generates — which is why any workflow built on "the flight number is in the top-left corner" fails on the second airline.
Why the Manual Path Fails — and What It Costs
The manual path doesn't just cost time; it breaks the audit trail that reimbursement depends on. If your team uses SAP Concur, Navan, or Expensify, booking data often flows in automatically — but the airfare line still lands with blanks where the fare breakdown, ticket number, and tax lines belong, especially when a trip was booked outside the corporate channel or paid on a personal card. Someone retypes them. That is where reconciliation trouble starts.
The failure modes are familiar to anyone who has closed a T&E cycle. A transposed flight number or a date entered from the wrong leg of a multi-segment itinerary means the expense no longer matches the booking — and if it doesn't match, an auditor or a card-feed algorithm flags it, and the employee gets asked to resubmit. A recurring complaint on r/Accounting describes exactly this loop: an employee asked to expense the same flight six times because the accounts payable team kept losing the receipt between systems. The complaint isn't about typing speed — it's about the document never becoming data that stays attached to the transaction.
The compliance stakes make this more than an efficiency annoyance. Under IRS rules, a reimbursement is only tax-free to the employee if the company runs an accountable plan — which requires that every expense be substantiated with the amount, the time, the place, and the business purpose. The IRS lays this out in Publication 463: a receipt (or other documentary evidence) for each expense, plus a record made at or near the time of the expense. A mistyped fare or a missing ticket number quietly erodes that substantiation across hundreds of trips. And the pressure on T&E accuracy is rising: in the 2025 Deloitte Corporate Travel Study, 54% of travel managers ranked cost among their top three constraints on travel — the more scrutiny spend gets, the more the receipts need to be right.
None of this is news to the travelers either. A thread on r/SAP about Concur puts the employee-side experience plainly: the system "has gotten so slow, it's PAINFUL to do an expense report of any sort." The fix isn't a faster UI — it's removing the retyping step so the itinerary data arrives already structured.
Define the Column Set: What Your Output Table Should Hold
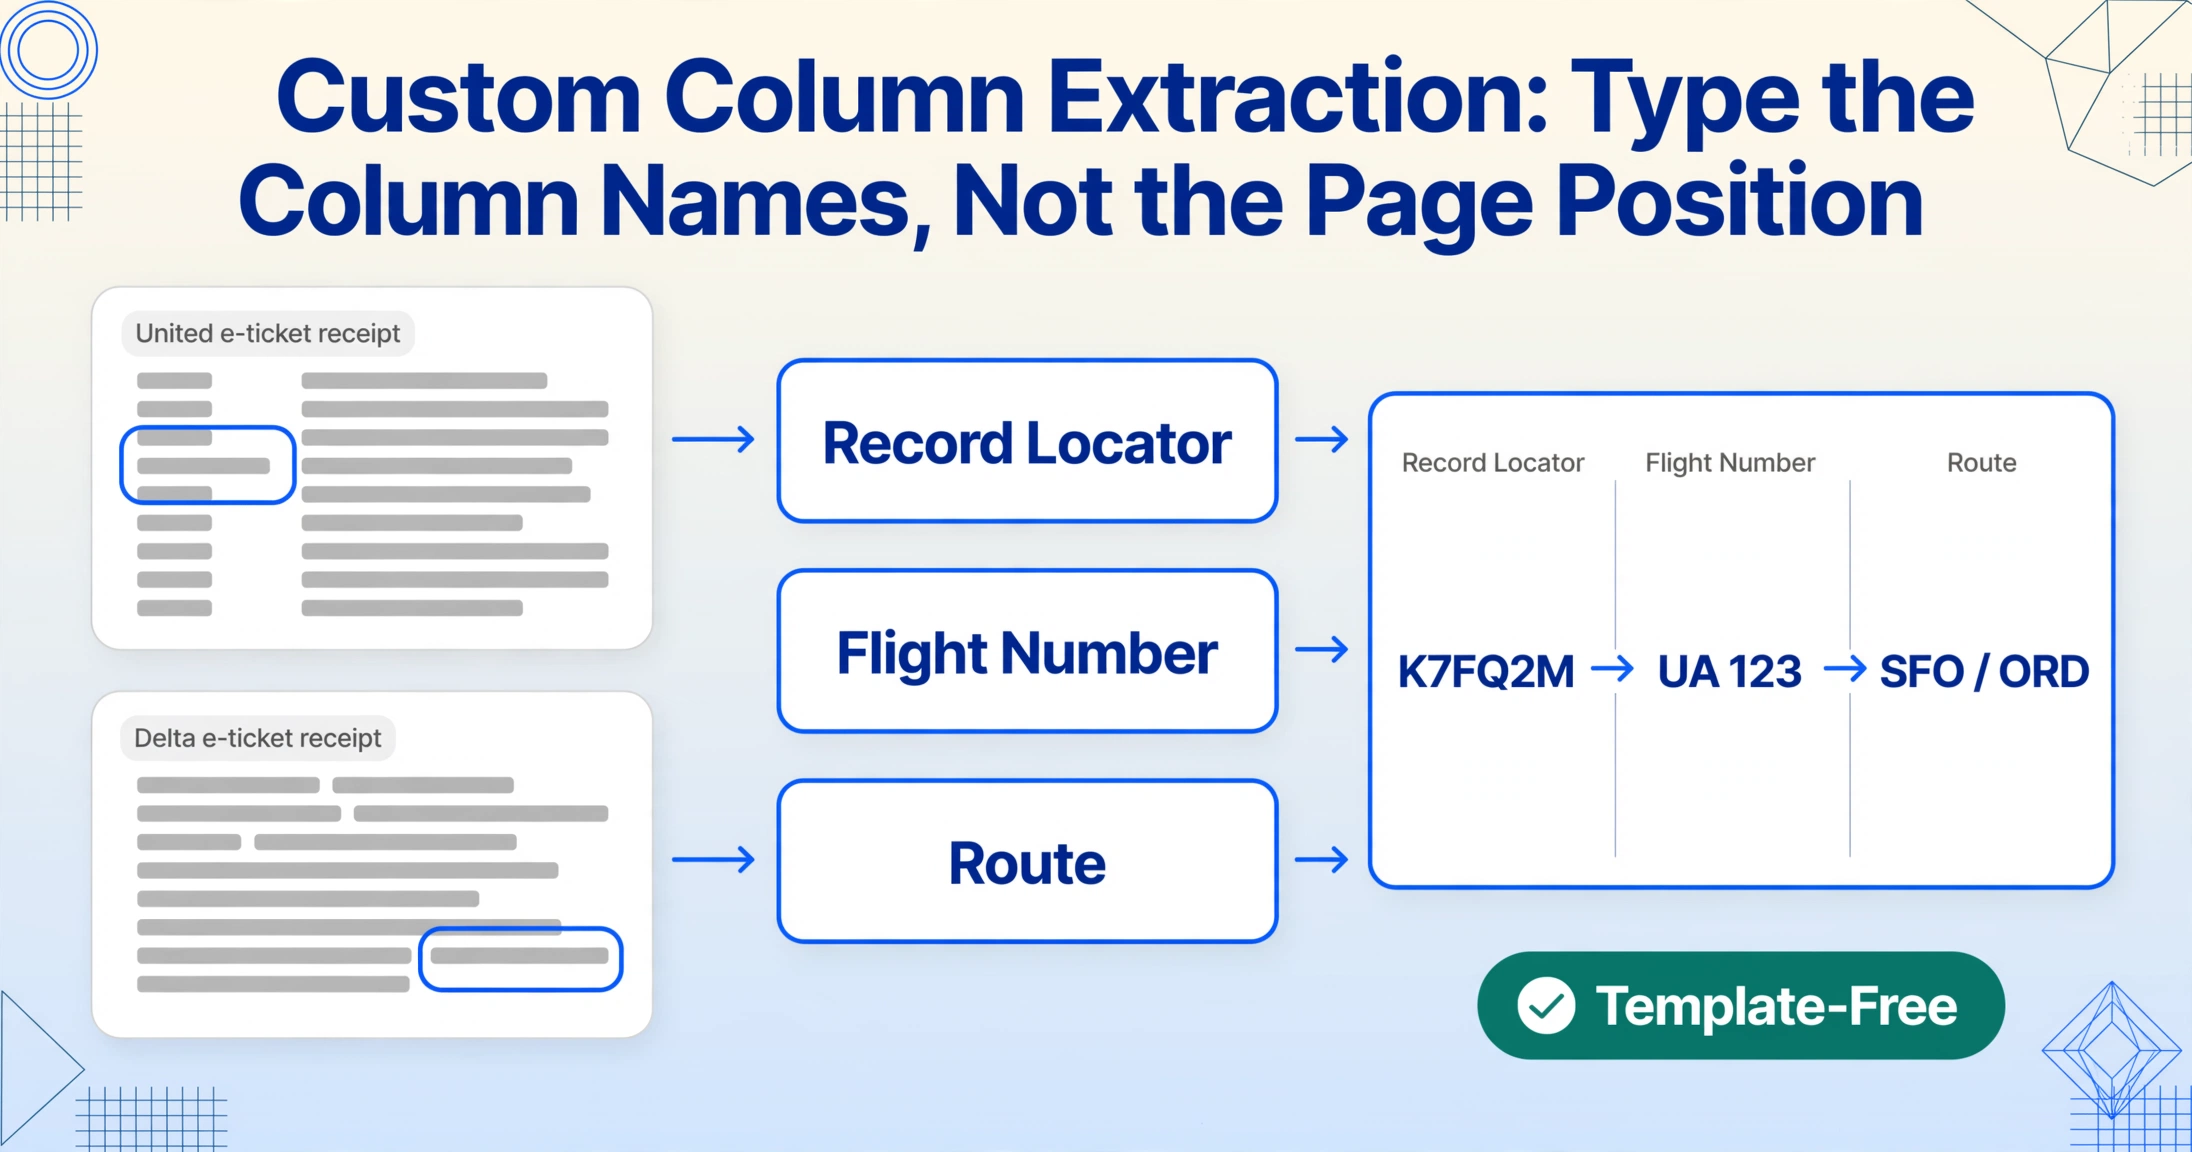
The output table is defined by the columns you name — and for flight itineraries, the right column set covers booking, fare, and compliance in a single row per segment. This is the core of Custom Column Extraction: instead of telling a tool where on the page to look (the approach that dies on the second airline's layout), you type the column names you want — "Record Locator," "Flight Number," "Total Paid" — and an AI vision model locates each value by understanding what the field means, wherever it sits on the document.
For a flight itinerary batch, a column set that covers a full T&E close looks like this — you can copy it as-is:
| Column name to type | What the AI extracts |
|---|---|
| Record Locator | The 6-character PNR (e.g. K7FQ2M) |
| Passenger Name | Name on the ticket |
| Flight Number | e.g. UA 123 |
| Flight Date | Departure date of the segment |
| Departure Airport / Arrival Airport | IATA codes, e.g. SFO / ORD |
| Departure Time / Arrival Time | Local times as printed |
| Booking Class | Fare class letter (e.g. V) — policy checks on premium cabins |
| Base Fare / Taxes & Fees / Total Paid | The three-level fare split, kept in separate columns |
| Currency | ISO code of the ticket — critical for international trips |
| Ticket Number | 13-digit e-ticket number |
| Baggage Allowance | Included bags (e.g. 1 x 23kg) |
| Trip Purpose | Inferred — see below |
Two of those columns do more than read the page. A computed column performs a calculation during extraction: for a multi-segment ticket, a column named Fare Per Segment (Total Paid / Number of Segments) splits a single fare across the legs automatically, so each segment's row is independently allocable. And an inferred column classifies what the document never states: define "Trip Purpose" with options "Client Visit / Conference / Internal Meeting / Training / Personal," and the AI reads the itinerary — the route, the booking context, the surrounding report — and assigns each trip a purpose. Extraction and classification happen in the same pass, which is the difference between a table of numbers and a reimbursable record.
The column names you define once become the headers of your final spreadsheet — and the same set works across every airline, GDS, and booking tool in the batch, because each column is matched by meaning, not by position on the page.
Get the Itineraries Into One Place
Before extraction, the collection step decides whether the batch is complete — and it's the step most workflows don't plan for. Itineraries arrive in three shapes: PDFs forwarded from email, screenshots from airline apps or booking tools, and confirmations downloaded from corporate travel portals. Some of your travelers will upload them; some will forget until the card statement arrives. The collection design is what catches both.
Two mechanisms close the gap. An Email Inbox gives the team a dedicated forwarding address: travelers forward their itinerary PDFs (or the airline's own emails) and the attachments land in the processing queue automatically, with no upload page and no login. Combined with the "auto-process" setting, a bound extraction template starts reading each itinerary the moment mail arrives — a month of flight emails converts as they come in, instead of in a panic at month-end. For travelers who prefer a link, a Collection Link generates a shareable URL with a short verification code: anyone can open it and drop in their itinerary — screenshot, PDF, whatever they have — no account required. Both channels feed the same queue, so the batch assembles continuously during the month.
Source quality follows a simple order: a PDF from an email is the cleanest input; a flat, well-lit screenshot of the itinerary page works nearly as well; a hurried photo of a phone screen taken at an angle in airport light is workable but worth a verification pass. A realistic expectation to set: clear PDFs and screenshots produce high-confidence extraction, and poor captures shift the work from "typing" to "spot-checking."
Process the Batch: One Pass, One Spreadsheet
Batch processing turns a month of itineraries into a single spreadsheet in one pass — five to ten seconds per document, with the columns defined once. You upload every itinerary at once (the PDFs, the screenshots, the app captures), and the output is one Excel file where each row is one flight segment and each column is one defined field. No merging, no column realignment, no copy-paste between files. ImageToTable.ai processes a page in five to ten seconds against roughly three minutes of average manual entry — a meaningful comparison at a hundred itineraries, where it's the difference between a lunch break and a workday.
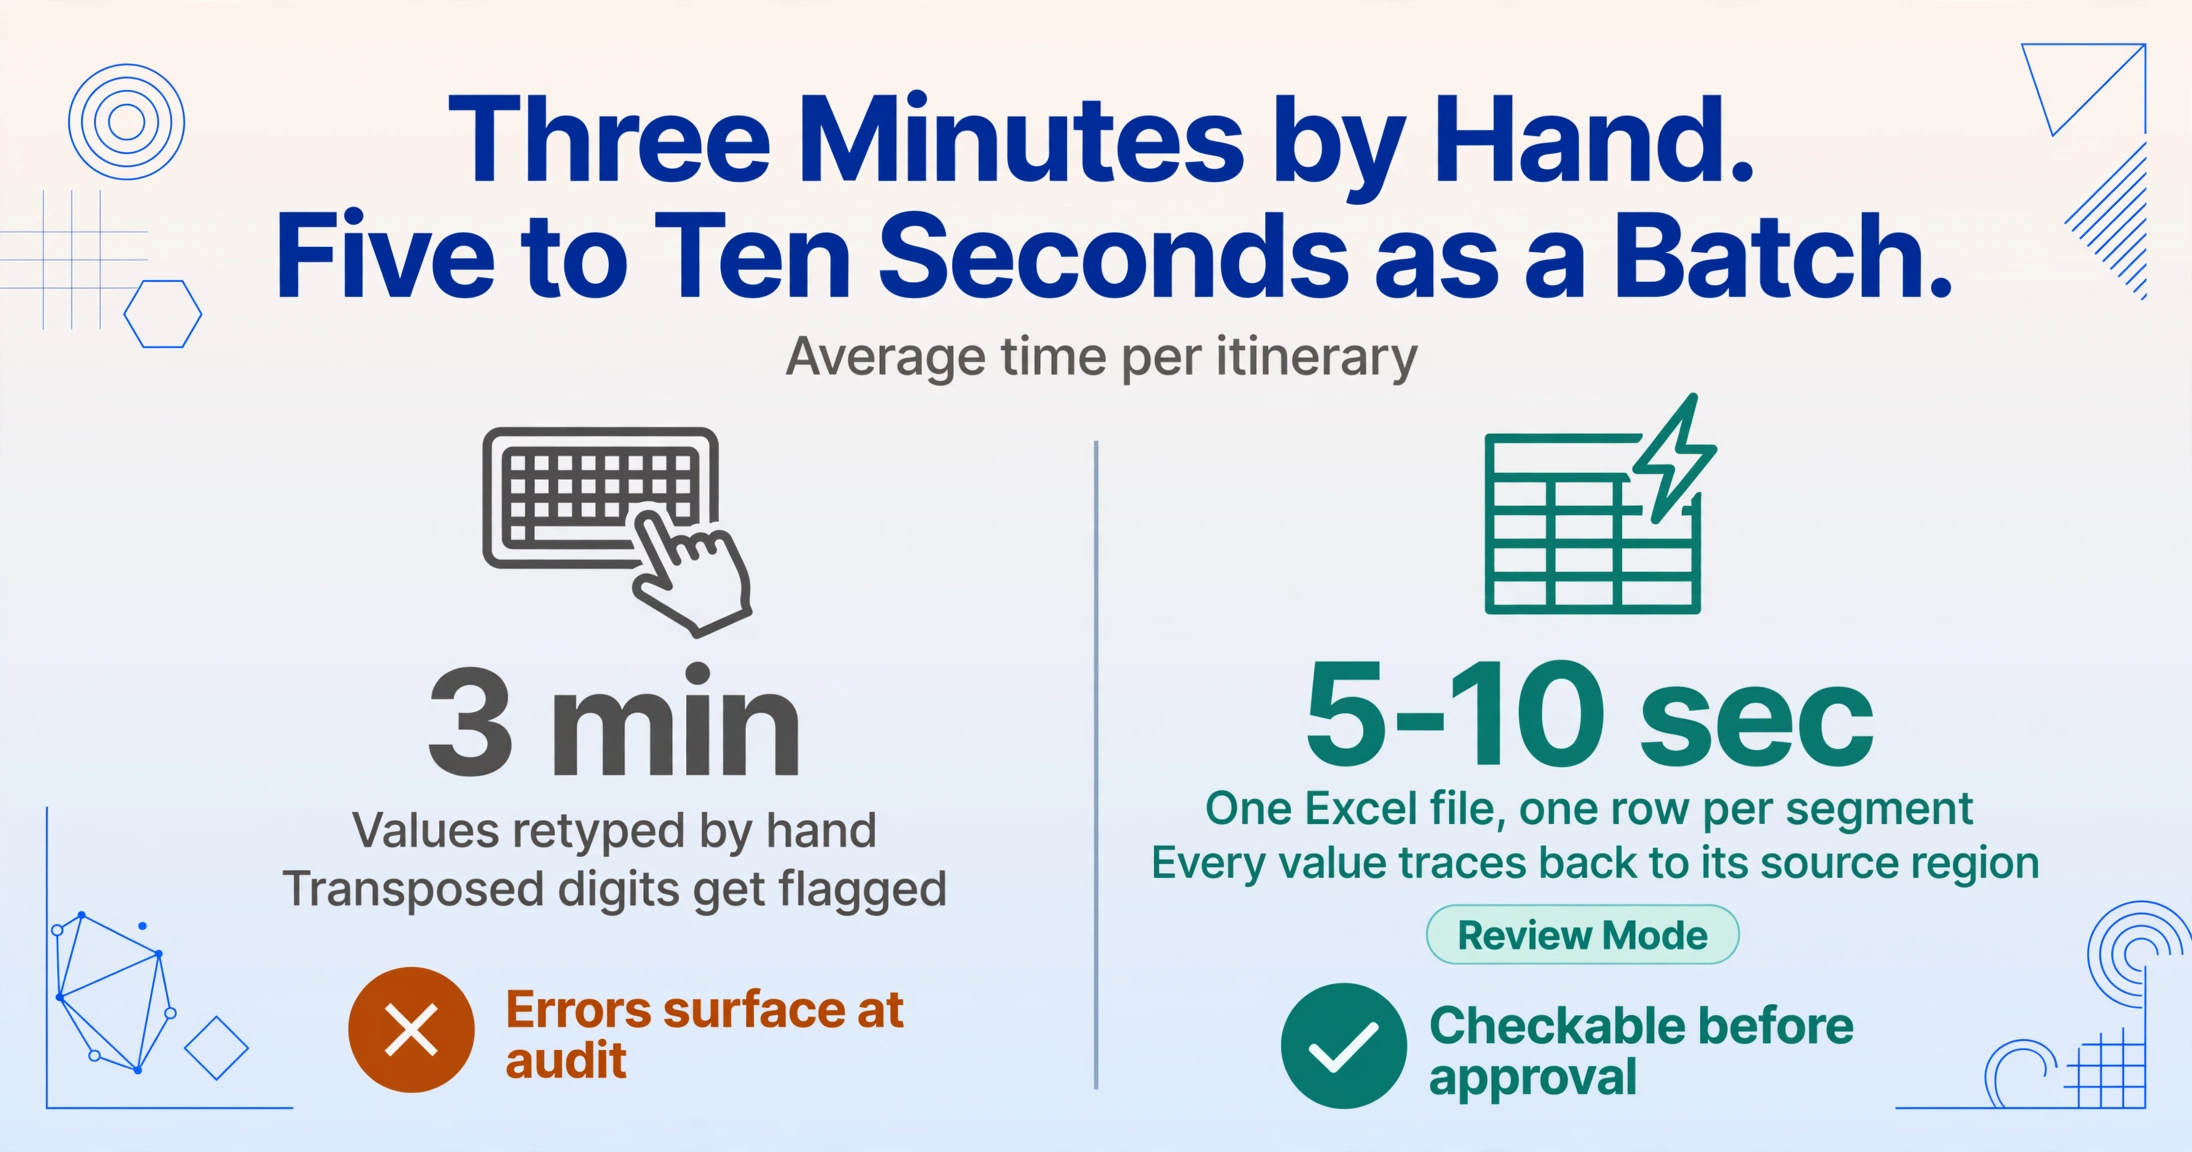
This is the moment the data becomes checkable. Review Mode lets a finance reviewer hover over any extracted cell and see exactly where the value came from on the original document — the fare basis, the tax line, the ticket number — highlighted on the itinerary image. Click any extracted value and the source region lights up; click a region on the document and it jumps to the matching cell. That layer matters for airfare specifically, because a wrong tax total propagates straight into the card reconciliation. Turn on auto-annotate after processing and every new extraction arrives with its verification map already built.
Files are processed securely and not stored.
From Spreadsheet to Reimbursement: Closing the Loop
Extraction ends at the spreadsheet; reconciliation begins there — and the extracted rows are built to feed your expense system, not sit beside it. The workbook you get from the batch is the structured version of what your T&E platform's OCR would have produced only for a clean receipt: fare, taxes, ticket number, route, dates, and trip purpose, all in columns. That structure is what makes the closing steps fast.
For a Concur or Navan shop, the extracted table maps directly onto the airfare line items: the record locator and ticket number give the card-feed matching something to anchor on, the total paid ties to the corporate card transaction, and the fare split explains why the charge never equals the advertised fare. For a smaller team on Expensify or Zoho Expense, the same workbook serves as the import source — rows in, categories attached, reimbursements approved. The point isn't that extraction replaces the expense platform; it's that expense report data arrives pre-structured instead of arriving as a PDF someone has to transcribe.
The compliance picture closes the same way. Each extracted row now carries the four substantiation elements an accountable plan demands: amount (base fare, taxes, total), time (flight date), place (origin and destination airports), and purpose (the inferred column). The GSA per-diem framework that many firms use for meals and lodging — $110/day standard CONUS lodging and $68/day for meals and incidentals in fiscal year 2026 — covers those categories on an allowance basis; airfare has no per-diem shortcut, so the itinerary receipt is the one travel receipt that always has to be real, complete, and legible.
The itinerary receipt is the only business travel expense with no allowance-based shortcut: per-diem covers meals and lodging, but airfare must always be substantiated with the actual document. That single fact is why flight itinerary extraction — not receipt scanning, not allowance automation — is the highest-leverage automation in the T&E cycle.
What Breaks in Practice (and How to Handle It)
The realistic failure points aren't exotic — multi-segment fares, currency mismatches, and change fees — and each has a defined handling. A clean batch of email PDFs runs almost without review; the exceptions are where the workflow earns its keep.
Multi-segment itineraries. A round trip is two flight numbers on one receipt; a trip with a connection is more. The extraction reads each segment line and produces one row per segment, with the computed "Fare Per Segment" column splitting the single fare across legs — so the reviewer can verify that two segments plus taxes equal the total before approving.
Itinerary currency vs. card currency. A Frankfurt–Chicago ticket priced in euros hits a card charged in dollars. The extracted "Currency" column keeps the original amount and ISO code intact, so the team converts at a policy-defined rate instead of whichever rate the typist happened to use — eliminating a recurring source of "this doesn't match the card statement" flags.
Totals-only receipts. Some booking tools and airlines send a summary showing the total without the fare breakdown. The extraction captures what's visible and leaves the fare-split columns empty — surfacing the gap instead of inventing numbers. The fix is to pull the full e-ticket receipt from the airline's portal (usually retrievable by entering the record locator), not to guess the split.
Changes, refunds, and low-quality captures. After a change, the itinerary and the trip receipt can disagree — the extracted rows give you both, side by side, so the difference is visible rather than buried. And on a poorly angled photo of a phone screen, accuracy drops: the honest expectation is that clean inputs extract at the tool's ~99% printed-text accuracy, while rough captures need a spot-check in Review Mode — still an order of magnitude faster than typing from scratch.
FAQ
Does this work with itineraries from any airline or booking tool?
Yes. Because the extraction matches fields by meaning rather than by template position, there's no per-airline configuration — a United e-ticket receipt, a Delta one, and a booking-tool itinerary from Concur Travel or Navan all flow through the same column definitions. Clear PDFs and flat screenshots extract with the highest accuracy; the layout differences between airlines don't matter to the extraction.
What if an itinerary shows only the total, not the fare breakdown?
The workflow extracts what the document shows and leaves the missing fare-split columns empty, flagging the gap rather than guessing. To get the full breakdown, pull the e-ticket receipt from the airline's portal using the record locator — most airlines let you retrieve it online — and process that document instead. This is worth doing for large fares, because the split between base fare and taxes is what makes a card charge reconcilable.
Can the extracted spreadsheet feed into Concur or Navan?
It works alongside them. Expense platforms are approval, policy, and reimbursement engines — they're not built to read a multi-airline, multi-format itinerary stack. The extracted workbook is structured input: the row for each segment carries the fare split, ticket number, dates, route, and trip purpose, which you can import or paste as the airfare line items instead of transcribing them. Smaller teams on Expensify or Zoho Expense use the same workbook directly. The cleaner the input data, the fewer manual overrides your platform needs.
How do I handle trips booked in another currency?
Keep the original amount and ISO currency code in the extracted table — the "Currency" column preserves what the ticket says. Convert at a single policy-defined rate (booking-date rate is the most defensible) rather than at whichever exchange rate the person typing happened to use. That consistency is what keeps multi-currency batches reconcilable against card feeds.
What about employees who booked personally and are asking for reimbursement?
The itinerary is still the receipt — the extraction captures the fare, taxes, and ticket number the same way, and the passenger-name column confirms the ticket belongs to the claimant. This is where a collection link sent to traveling staff pays off: the employee uploads the itinerary from their phone at the airport, and the data lands in your queue instead of being reconstructed from a forwarded PDF weeks later.
The flight itinerary is the last high-value receipt in finance that still gets retyped — not because the data is hard to read, but because each airline renders it differently, and every workflow built on "where the field sits on the page" breaks on the second airline. Once you define the columns you need and let the extraction read the document by meaning, the retyping step disappears, the fare split survives into the spreadsheet, and the reconciliation loop closes on data that matches the card — not on whatever survived transcription. That's the difference between a T&E close that takes a day and one that takes an afternoon.