Collect Employee Expenses into Google Sheets
Automatically — Collection Link + Sidebar Extraction as a Closed Loop
The hardest part of team expense management isn't reconciliation. It isn't calculation. It's collection — getting receipts and expense reports out of your team members' pockets, email inboxes, and camera rolls and into the single spreadsheet where you actually track spending. By the time a small business owner has reminded three people to submit their expenses, the bottleneck has already consumed more energy than the accounting itself. A Collection Link combined with Google Sheets sidebar extraction turns this dynamic around: instead of you chasing documents, the system collects them — and deposits the data directly into your shared sheet.
Key Takeaways
- 3,000 hours per year spent correcting expense report errors — and the errors exist not because the math is hard, but because the receipt never left the employee's pocket.
- Your team doesn't have a receipt-submission problem — it has an account-creation bottleneck masquerading as laziness that every expense platform inherits from enterprise software design.
- ImageToTable.ai eliminates expense collection friction with a shareable link that accepts uploads from anyone without accounts — then AI extracts the data directly into your Google Sheet.
The Collection Problem — Why Chasing Receipts Is the Real Bottleneck
Talk to any small business owner or team lead about expense management, and the frustration they describe isn't the math. It's the hunt. "I spend more time reminding people to submit receipts than I spend reviewing them." "I have three people who are great at their jobs and terrible at logging expenses." "Every month-end I'm texting people photos of receipts they left on my desk two weeks ago." This is the collection problem, and it's the part of expense management that dedicated software solves — but at a price, and with platform lock-in, that small teams often can't justify.
The numbers back up what every team lead feels. According to the Global Business Travel Association, the average expense report takes 20 minutes to process from submission to reimbursement — and 19% of reports contain errors that require another 18 minutes and $52 to correct (GBTA Foundation study). The US Chamber of Commerce found that 40% of small businesses cited "employee time spent filling out expenses and collecting receipts" as their top expense management issue (US Chamber Center survey). The same GBTA research found that companies spend an average of 3,000 hours per year just correcting expense report errors. For a team of eight people, that's roughly 375 hours per person per year — nearly ten full work weeks — consumed by expense administration that generates zero revenue.
The collection problem has a compliance dimension too. Under the IRS accountable plan rules (IRS Publication 463 and Treasury Regulation §1.62-2), tax-free reimbursements require employees to substantiate expenses with receipts and business purpose documentation within 60 days of incurring the expense. When collection is a manual chase, that 60-day window shrinks fast — and reimbursements that miss the window can be reclassified as taxable wages. The tax risk doesn't come from bad math. It comes from bad collection.
The traditional solutions to this problem fall into two camps, neither of which fits the small-team reality well. The first camp is "use a template" — free Google Sheets expense trackers that organize data beautifully once it's entered, but do nothing to reduce the entry burden. The second camp is "buy a platform" — Expensify at $5+/user/month, Ramp (free but requires their corporate card), SAP Concur (enterprise-focused, starting much higher), or Zoho Expense ($3/user/month). These platforms solve the collection problem by giving every employee a mobile app with receipt scanning and auto-submission. But they also mean migrating from a spreadsheet workflow that works, introducing per-user costs that scale with team size, and accepting that your expense data now lives in a tool that may or may not integrate with the rest of your financial stack. For a team of six people, Expensify costs $360/year minimum — for a workflow that could run inside the Google Sheets environment the team already uses.

What a Collection Link Is — and How It Solves the "I Haven't Signed Up" Problem
A Collection Link is a shareable URL that you generate once and distribute to anyone who needs to send you documents. The recipient opens the link, enters a short verification code, and uploads their files directly. No account. No registration. No login. The files land in your processing queue — not theirs. You keep control of the data and the extraction, while they only need a browser and the files they're supposed to send you.
This mechanism changes the power dynamic of expense collection in a specific way. In a manual workflow, the burden sits with the collector (you) — you remind, you follow up, you type the data. In a Collection Link workflow, the burden shifts to the submitter (the employee), but in a way that's dramatically easier than what they were doing before. Instead of "send me your receipts and then I'll type them into the sheet," it becomes "here's a link — drop your receipts in, and the data appears in the sheet." The employee's job went from "find receipt, email it, describe the expense" to "find receipt, upload it." That's a smaller ask, which means it actually happens.
The no-account requirement matters more than it might seem. Every expense platform requires every team member to create an account, verify an email, possibly install an app, and learn an interface. That's a reasonable ask for a 50-person company with an HR onboarding process. For a 5-person construction crew, a 3-person consulting firm, or a 8-person retail team, it's enough friction that the owner ends up doing everyone's expenses manually because "it's faster than teaching them another tool." A Collection Link removes that entire layer. The link works the first time, with zero setup on the recipient's end.
Here's what the practical workflow looks like from the team member's perspective: they make a business purchase, get a receipt (paper or digital), and keep it. At any point during the month — ideally immediately, while the expense is fresh — they open the Collection Link you shared (bookmarked, pinned in Slack, or saved in a team email), enter the verification code, and upload the receipt. That's their entire obligation. No form to fill out. No category to guess. No "employee ID" field. Just upload and close the tab. The data extraction happens on your end, controlled by the column names you define.
From Queue to Sheet — Sidebar Extraction as the Second Half of the Loop
Collection alone doesn't close the loop. Files sitting in a queue still need to become rows in a spreadsheet. That's where the Google Sheets add-on sidebar completes the workflow. The add-on is a panel that opens inside Google Sheets — you don't leave your spreadsheet to use it. From the sidebar, you can see the files that have arrived through your Collection Link, specify what data to pull from them, and extract structured rows directly into the active sheet. For the full capability rundown — supported field types, formats, and plan details — see the Google Sheets add-on reference.
The extraction works through column-name extraction: you define the column headers you want in your sheet — "Date," "Employee," "Vendor," "Amount," "Category" — and the AI reads each uploaded document to find the values that match each column name. This is fundamentally different from template-based OCR that requires you to draw boxes around fields or train on sample layouts. Column-name extraction works because the AI understands what "Vendor" means semantically — it looks for the merchant name regardless of where it appears on a receipt, a PDF expense report, or a screenshot of an emailed invoice. A restaurant receipt, a Home Depot receipt, and an emailed Uber receipt all look completely different, but all of them contain a vendor name, a date, and an amount. The AI finds each one without you configuring a template for every receipt format your team might submit.
One of the most valuable extraction modes for team expense tracking is inferred columns — AI-generated fields the document doesn't explicitly contain. For example, you can define a column called "Category" with options like "Meals / Travel / Supplies / Tools / Other." The AI reads the receipt content — a restaurant name suggests "Meals," a hardware store suggests "Supplies" or "Tools" — and fills in the appropriate category automatically. The receipt itself has no "Category" field. The inference happens during extraction, and the result appears alongside the directly extracted data in the same row. This means your shared sheet can have consistent, categorized expense data without any team member ever seeing a dropdown menu or filling out a category field. Setting up the team expense sheet with the right columns and inferred categories is covered step-by-step in the team expense tracker setup guide.
Because the sidebar sees all files that have arrived through your Collection Link, you can process them in batch: select multiple uploads — say, eight receipts from three different team members that came in over the past week — and extract them all at once into the shared sheet. Each uploaded file becomes one row, and each row carries the extracted data under the column headers you specified. The sheet populates incrementally. You can run extraction daily, weekly, or whenever the queue builds up — the sidebar appends new rows below existing data so you never overwrite previous entries.
The Closed Loop in Practice — A Month of Team Expenses
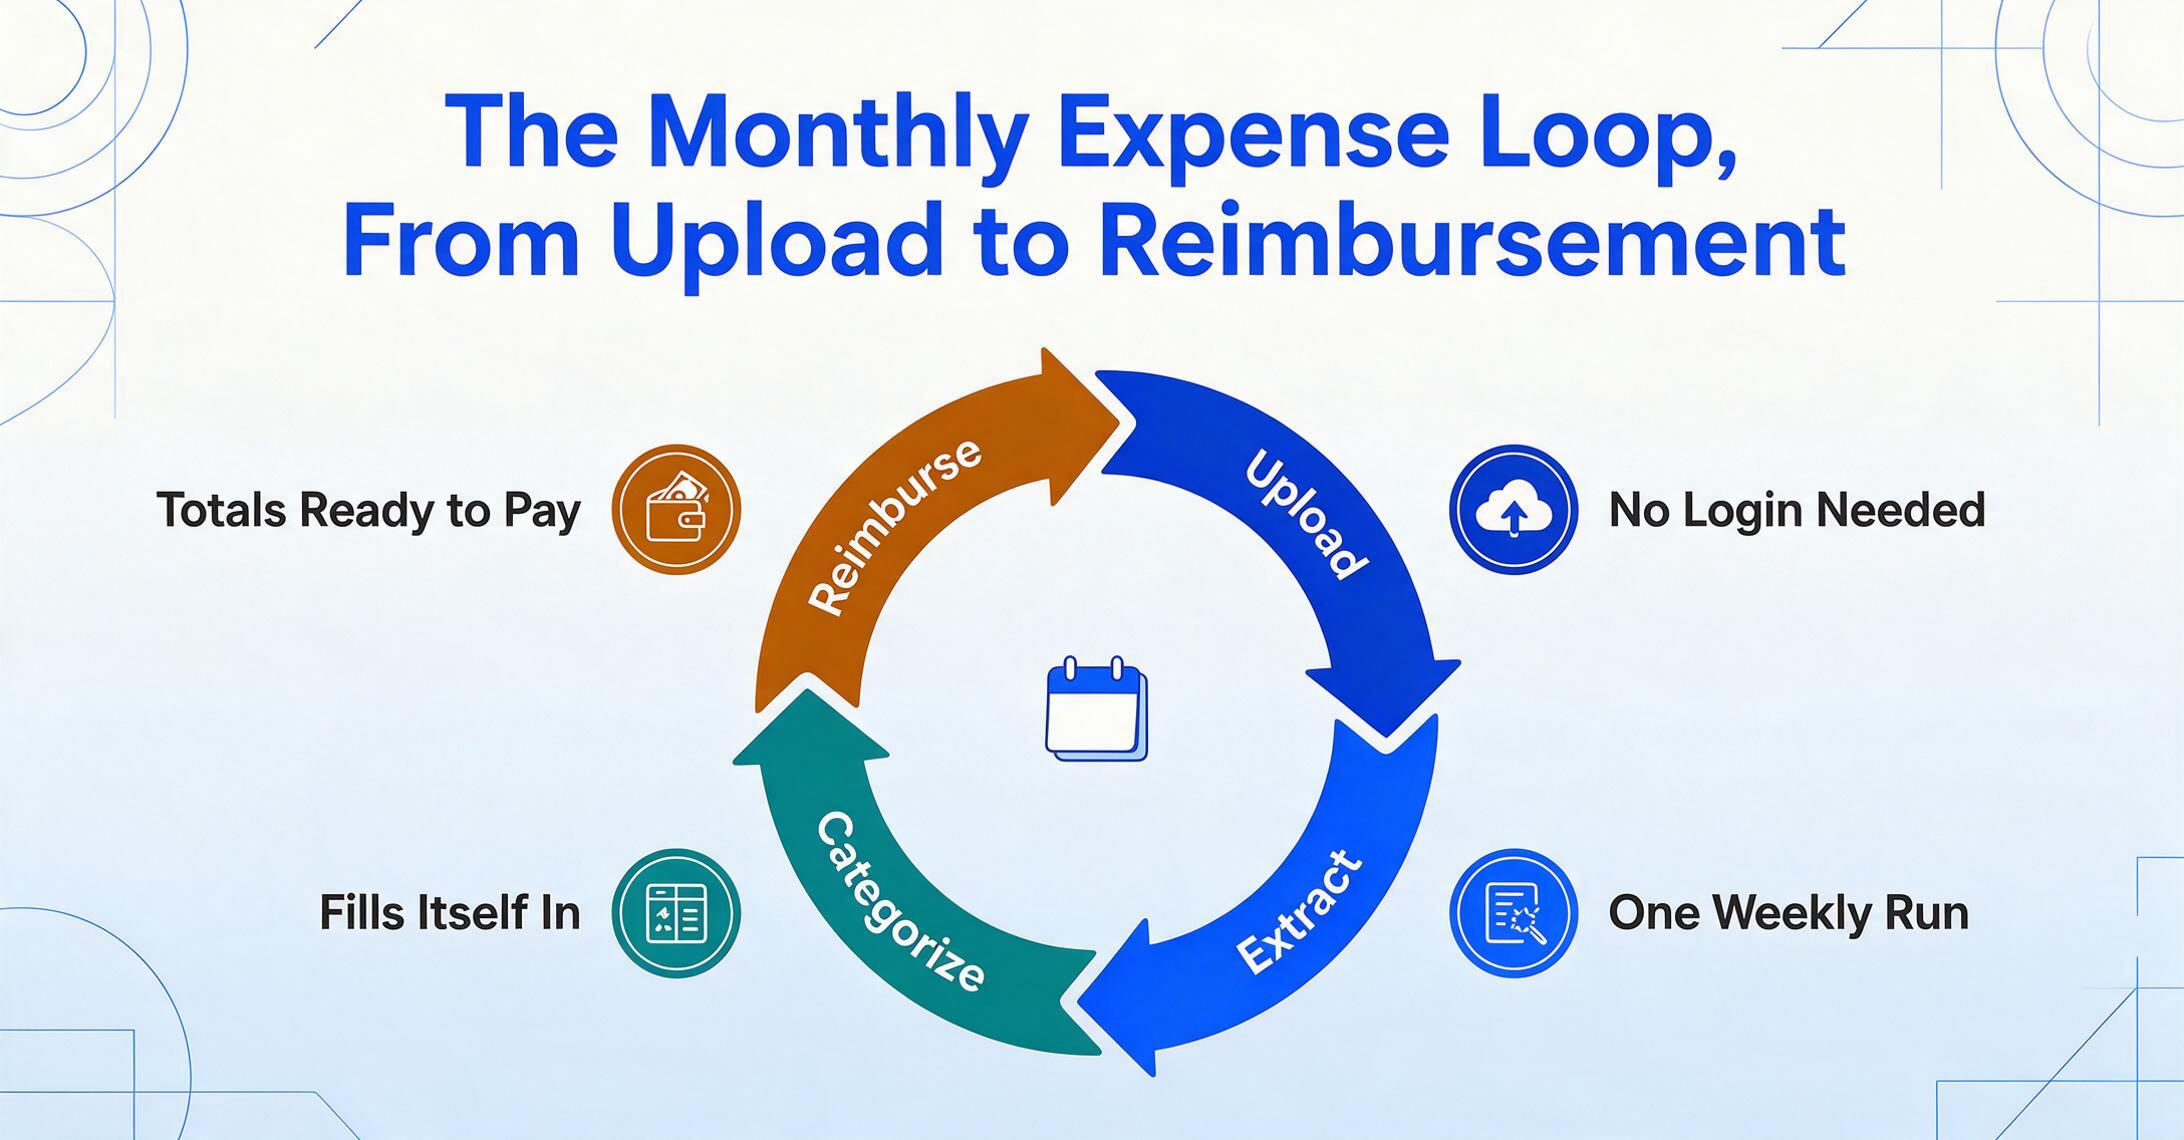
Here's what a complete monthly expense cycle looks like with the Collection Link + sidebar extraction loop in place:
Day 1 — Setup. You generate one Collection Link for your team. You share it in the team chat, pin it to a shared document, or include it in the welcome email for new team members. (You can generate multiple links if you want separate queues for different teams or expense types, but one link is usually enough.) You also have your shared Google Sheet set up with the column structure you want — typically Date, Employee, Vendor, Description, Amount, and Category. The Category column uses inferred extraction so expenses self-categorize.
Days 1–30 — Collection. Throughout the month, team members make purchases, get receipts, and upload them via the Collection Link. No one emails you. No one drops paper on your desk. No one waits until the 29th and sends you twelve receipts in a panic. The receipts accumulate in your processing queue, organized by upload timestamp. If someone loses a receipt, you know immediately — there's no end-of-month surprise.
Weekly — Extraction. Once a week (or twice a month, or daily — whatever cadence fits your cash flow visibility needs), you open your shared Google Sheet, launch the add-on sidebar, and extract the queued files. Select all new uploads, confirm the column mapping, and hit extract. Within seconds, new rows appear in the sheet — each receipt becomes a structured record with date, employee, vendor, amount, and AI-assigned category. You're not typing anything. You're reviewing and, if needed, adjusting. The time commitment is measured in minutes per week, not hours per month-end.
Month-end — Reconciliation. By the time month-end arrives, the sheet already contains all team expenses for the period — categorized, dated, attributed to individual employees. What used to be a multi-day scramble of chasing missing receipts, typing data, and guessing categories is now a review session. You check a few AI-assigned categories, confirm totals, and either export for your accountant or run your own reimbursement calculations directly in the sheet. The IRS 60-day substantiation window — the deadline by which employees must provide receipts and business purpose documentation under the accountable plan rules — was never in danger, because uploads happened throughout the month as expenses occurred.
The collection link requires the person who generates it (the account owner) to have available extraction credits — each document uploaded through the link consumes one extraction when processed. Team members who upload don't need credits of their own, and they don't need accounts. This is the central constraint of the workflow: the person running the extraction pays for the processing capacity. For a team of eight people submitting an average of ten expense documents each per month, that's 80 extractions — well within the scope of a mid-tier plan.
How This Compares to Dedicated Expense Software
This workflow isn't trying to replace Expensify or Ramp for teams that already use them and are happy. It's an alternative for teams that are currently doing expenses manually in Google Sheets and evaluating whether to (a) buy software or (b) find a lighter way to automate the existing sheet workflow. Here's how the comparison breaks down on the dimensions that matter to a small team:
| Dimension | Collection Link + Add-on Workflow | Dedicated Expense Software (Expensify, Ramp, etc.) |
|---|---|---|
| Team member setup | None — upload via shared link, no account needed | Every team member needs an account, email verification, app install |
| Per-user cost | None — only the account owner needs a plan with extraction credits | $3–$18/user/month depending on platform and tier |
| Where data lives | Your Google Sheet — compatible with any downstream workflow | Platform database — export-dependent for external use |
| Corporate card integration | No — receipt uploads only, not transaction sync | Yes — auto-matching of card transactions to receipts (Ramp, Brex) |
| Policy enforcement | Manual — you review extracted data and flag issues | Automatic — real-time spend limits, category restrictions, approval workflows |
| Receipt capture method | Upload via Collection Link (browser) or add-on sidebar | Mobile app with camera capture, auto-matching to transactions |
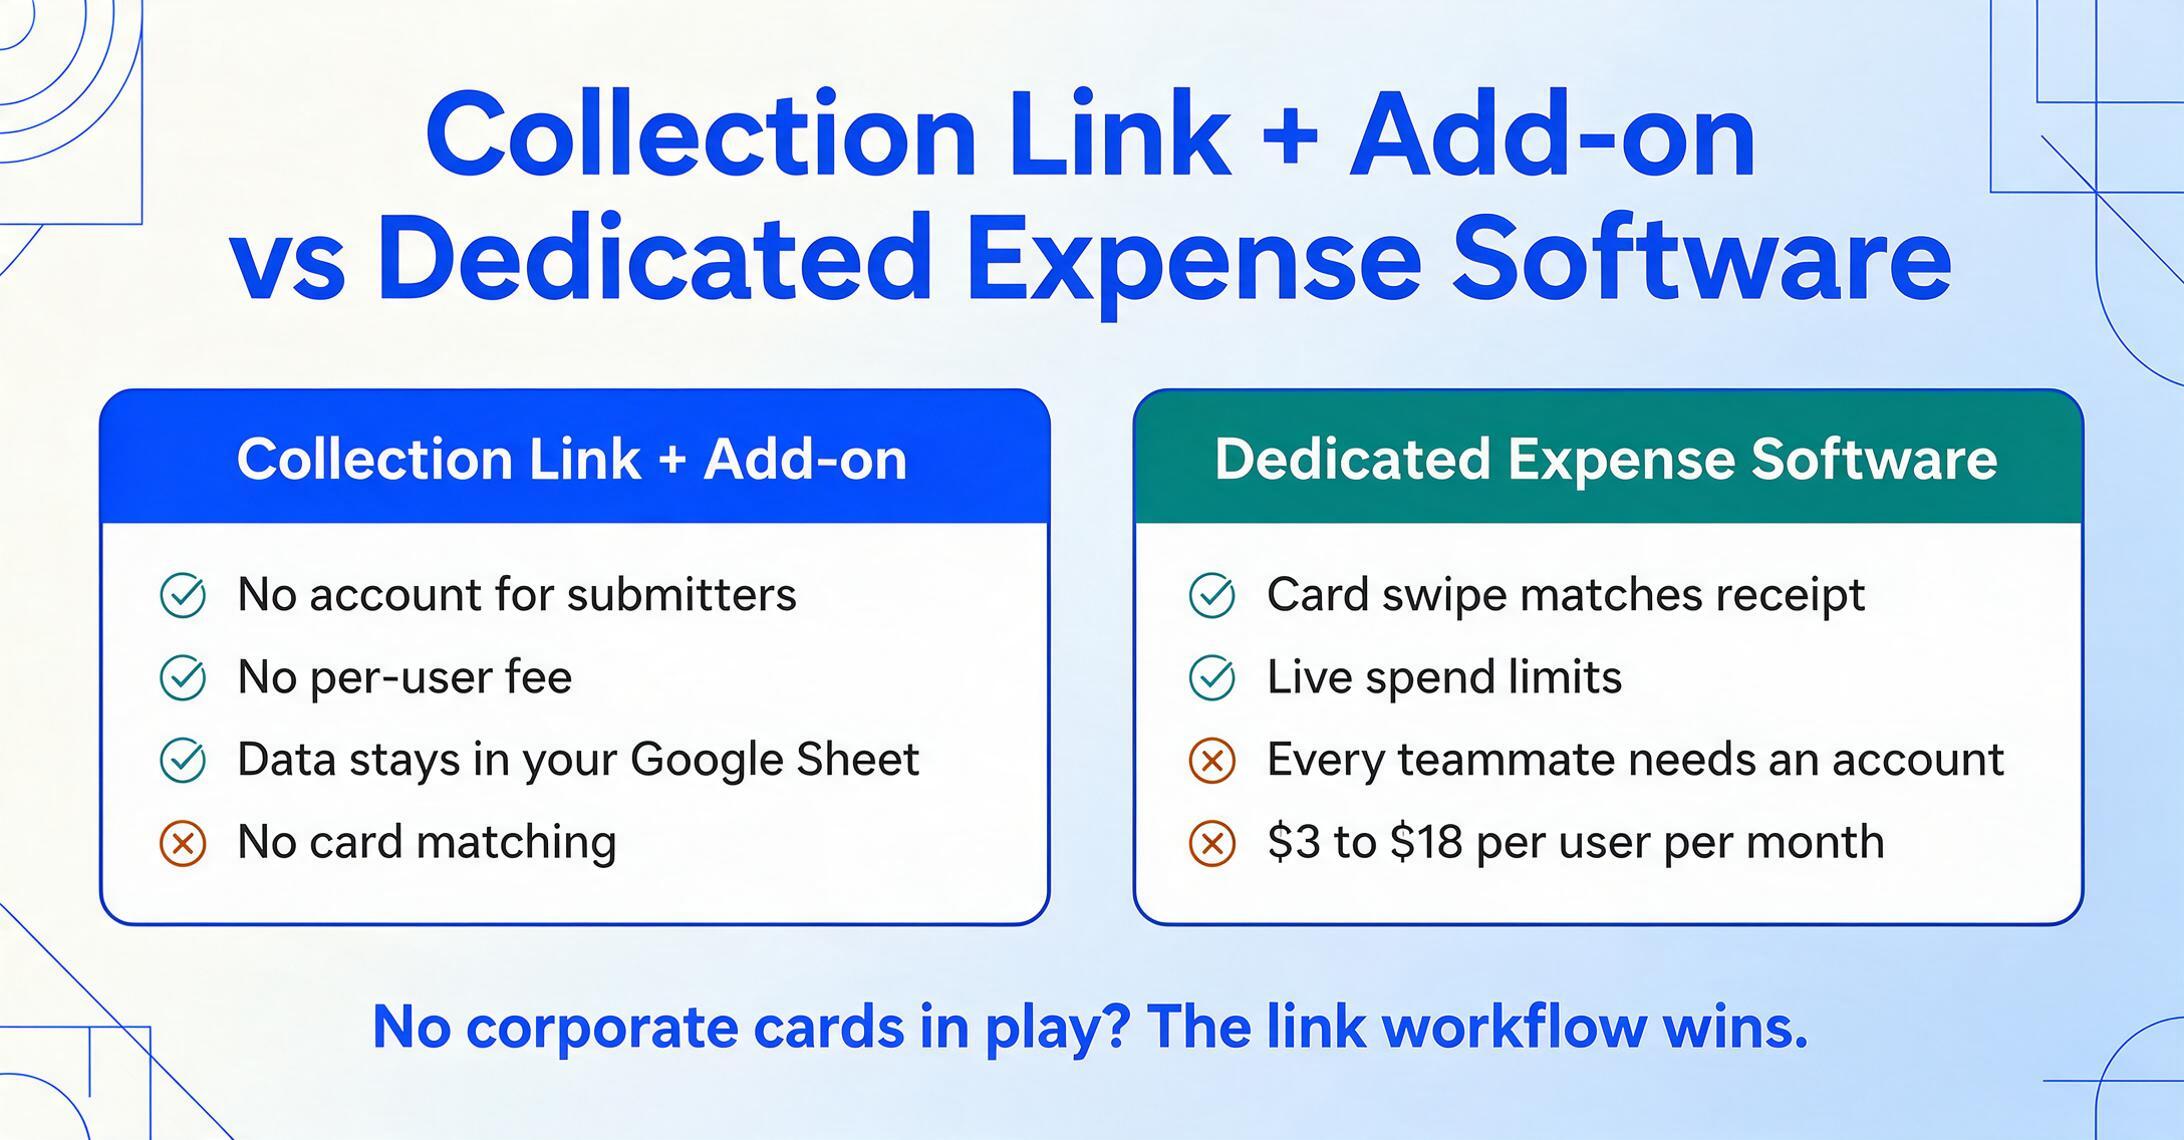
The trade-offs are real. If your team issues corporate cards and wants transactions automatically matched to receipts at the point of swipe, a platform like Ramp or Brex does that — and the add-on workflow doesn't. If you need multi-level approval chains where a manager signs off before finance sees the expense, dedicated software has that built in. The add-on workflow strips expense collection down to its essential components: get the receipts, extract the data, get it into the sheet. For teams that don't need the additional layers, that minimalism is the feature — not a limitation.
The other dimension worth noting is receipt-specific extraction. If most of your team's expenses come through paper receipts rather than formal expense reports, the add-on handles them the same way — photos of receipts, PDF scans, and screenshots are all valid inputs. For a deeper look at how receipt extraction works in the sidebar, see the receipt-to-Google-Sheets extraction guide.
Building the Monthly Rhythm — Making Collection a Habit, Not an Event
The biggest variable in any team expense workflow isn't the tool — it's whether people use it consistently. A Collection Link reduces friction to near zero, but it doesn't create the habit. The habit comes from the rhythm you establish:
Tie uploads to purchases. The simplest behavioral nudge: "Upload the receipt before you leave the parking lot." When the Collection Link is bookmarked on a phone's home screen, uploading takes less time than folding a paper receipt into a wallet.
Make extraction visible. When team members can see their expenses appear in the shared sheet — categorized, totaled, ready for reimbursement — they see the direct result of their upload. That visibility creates a feedback loop that manual submission (where the employee sends a receipt into a void and hopes it gets processed) never provides.
Set a weekly extraction cadence. Don't wait until month-end to process the queue. A weekly 15-minute extraction session keeps the sheet current, catches missing uploads while the expense is still fresh, and prevents the end-of-month pile-up that makes expense management feel like a crisis. Weekly extraction also means your cash flow visibility is always within seven days of current — not thirty.
Use the sheet as the single source of truth. Once extraction populates the sheet, that sheet is your expense ledger. Filter by employee for individual reimbursement totals. Pivot by category for spending analysis. Share a read-only view with your accountant at tax time. The sheet is already where your financial tracking lives — extraction just eliminates the data entry step that kept it incomplete.
Frequently Asked Questions
Do team members need an ImageToTable.ai account to upload via Collection Link?
No. The Collection Link is designed for recipients who don't have accounts. They open the link, enter a verification code, and upload files. No registration, no login, no software installation. The account that matters is yours — you need an active plan with extraction credits, since you're the one running the extractions.
What happens if a team member uploads a blurry photo of a receipt?
The AI extraction quality depends on input quality. A clear, well-lit photo of a receipt will extract nearly all fields accurately. A dark, blurry, tilted photo will produce gaps or errors. The sidebar shows you the extracted data before it lands in your sheet, so you can review and correct anything that didn't come through cleanly. Encourage team members to take straight-on photos in good light — the same standard they'd use for an Expensify or Concur mobile upload.
Does this workflow meet IRS receipt requirements?
The IRS accountable plan rules (Publication 463) require employees to substantiate expenses with documentation showing amount, date, place, and business purpose — generally within 60 days of the expense. The structured data in your sheet (Date, Vendor, Amount, Description columns) maps directly to the substantiation requirements. The original receipt images remain in your processing history as supporting evidence. The workflow helps meet the 60-day timeline by making uploads frictionless enough that they happen when expenses occur, not weeks later. However, for lodging expenses and any expense over $75, the IRS requires actual receipts — not just extracted data — so retain the original receipt images.
Can multiple team members upload at the same time?
Yes. The Collection Link works independently of how many people use it simultaneously. Each upload enters the queue with a timestamp, and you process them in any order from the sidebar. There's no limit on concurrent uploaders.
Can I have separate Collection Links for different teams or expense types?
Yes. You can generate multiple Collection Links — one for your field crew and another for your office staff, or separate links for different project budgets. Each link feeds into the same processing queue, but you can distinguish uploads by which link they came through. This gives you segmentation without adding complexity for the people uploading.
What if I process the same batch of files weekly — will it duplicate rows?
The sidebar tracks which files have been extracted and won't duplicate rows from files you've already processed. You can run extraction as often as you like — only new uploads will generate new rows.
How many receipts can one Collection Link handle before I run out of credits?
Each upload processed through the add-on consumes one extraction credit from your plan. A team of five people submitting ten receipts each per month = 50 extractions per month. The mid-tier plan covers this volume; higher-volume teams should check the current plan limits. Credits are consumed by the account that runs the extraction, not by the people uploading.
The thing that makes team expense management feel like a chore isn't the numbers — it's the collection. The spreadsheet was never the problem. Getting data into it was. Once that gap closes, the entire monthly cycle changes shape: no more chasing, no more typing, no more end-of-month scramble. What's left is a review session over a sheet that already has the data — categorized, attributed, ready for whatever comes next.